To calibrate a blend door actuator, locate the actuator, remove it, and test it before re-installing it. In vehicles with electronic actuators, follow manufacturer instructions for recalibration.
Ensure the actuator is properly aligned, and reconnect any electrical connectors before re-installing. Test the actuator functions to verify proper calibration.

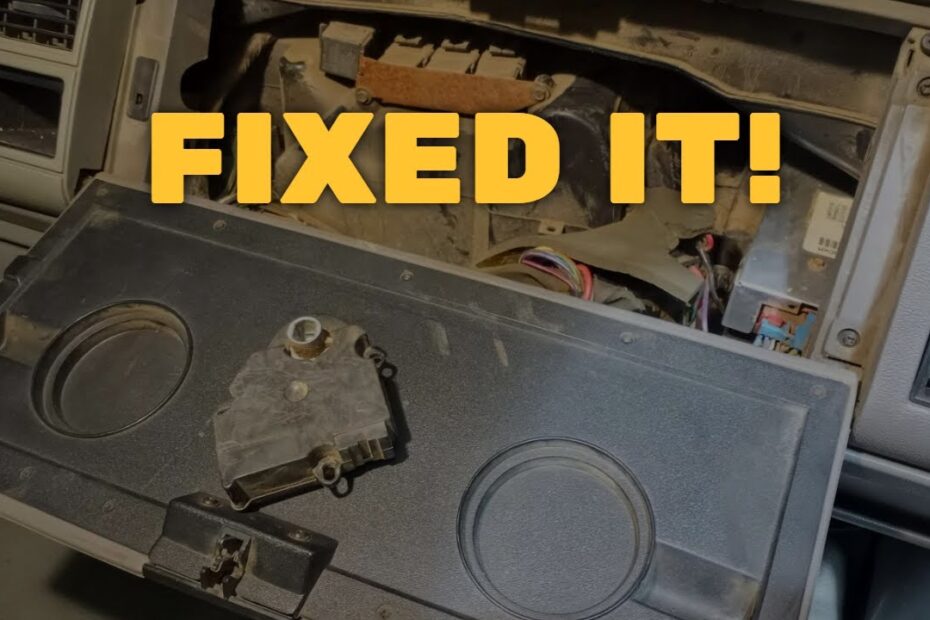
Credit: f150advisor.com
What Is A Blend Door Actuator?
Definition And Function Of A Blend Door Actuator
A blend door actuator is an essential component of a vehicle’s heating, ventilation, and air conditioning (hvac) system. It controls the flow of hot and cold air by adjusting the position of a blend door, determining the temperature inside the cabin.
Understanding the definition and function of a blend door actuator is crucial for maintaining optimal comfort while driving.
Here are some key points about blend door actuators:
- The blend door actuator is typically a small electric motor or a servo that operates in response to the climate control system’s instructions.
- It is usually located behind the dashboard and connected to the blend door, which directs the airflow through different heating and cooling channels.
- The actuator precisely positions the blend door based on the driver’s temperature settings, allowing the right amount of hot or cold air to mix with the ambient air.
- By adjusting the blend door, the actuator regulates the airflow to achieve the desired cabin temperature, whether it’s warm or cool.
A blend door actuator plays a vital role in maintaining the desired temperature inside a vehicle’s cabin by controlling the airflow through the heating and cooling channels. Understanding its function is crucial for troubleshooting and ensuring comfortable driving conditions.
Symptoms Of A Misaligned Blend Door Actuator
If you’re experiencing issues with your hvac system, it’s possible that the blend door actuator may be misaligned. The blend door actuator controls the blend door, which regulates the flow of air between the heater core and the air conditioning evaporator.
When the blend door actuator becomes misaligned, it can lead to several noticeable symptoms. Let’s take a closer look at these symptoms:
Weird Noises Coming From The Hvac System:
- Clicking or tapping sounds: One of the most common signs of a misaligned blend door actuator is the presence of strange clicking or tapping noises coming from your hvac system.
- Rattling or knocking sounds: Another symptom you may notice is a rattling or knocking sound, which can indicate that the blend door actuator is no longer functioning correctly.
- Grinding sounds: If you hear a grinding noise when adjusting your hvac controls, it’s likely that the blend door actuator has become misaligned and is rubbing against other components.
Inconsistent Airflow From The Vents:
- Weak airflow: One sign of a misaligned blend door actuator is weak or reduced airflow coming from the vents. This can result in poor heating or cooling performance, as the blend door is not opening or closing properly.
- Intermittent airflow: Another symptom you may experience is intermittent airflow, where the air coming from the vents fluctuates in intensity. This can make it difficult to maintain a comfortable temperature inside your vehicle.
Inability To Control Temperature Effectively:
- Inconsistent temperature: If you’re finding it challenging to control the temperature inside your vehicle, it could be due to a misaligned blend door actuator. The blend door may not be properly adjusting the flow of warm or cool air, resulting in inconsistent temperature output.
- Inefficient heating or cooling: A malfunctioning blend door actuator can also cause inefficient heating or cooling. You may find that your hvac system struggles to reach the desired temperature, or that it takes an excessive amount of time to do so.
Remember, if you’re experiencing any of these symptoms, it’s important to have your blend door actuator inspected and calibrated by a professional. Addressing this issue promptly can help restore proper functionality to your hvac system and ensure you stay comfortable on the road.
Tools Needed For Calibrating Blend Door Actuator
Calibrating the blend door actuator in your vehicle is an essential step to ensure optimal cooling or heating performance. To successfully carry out this task, you will need a few tools. In this section, we will outline the tools required for calibrating the blend door actuator.
Here are the tools you will need:
- Screwdriver: A screwdriver is necessary for removing any screws or fasteners securing the blend door actuator. It allows you to access the actuator and make the necessary adjustments. Make sure to choose the right type and size of screwdriver for your vehicle’s specific requirements.
- Multimeter: A multimeter comes in handy for troubleshooting any electrical issues related to the blend door actuator. It allows you to measure voltage, resistance, and continuity, helping you identify any problems with the actuator’s electrical connections. This tool is especially useful if you suspect a malfunctioning actuator due to electrical faults.
- Diagnostic tool (optional): While not essential, a diagnostic tool can be incredibly helpful in identifying any underlying problems with the blend door actuator. These devices provide detailed information about the actuator’s performance, allowing you to diagnose issues accurately. However, keep in mind that a diagnostic tool may not be available for all vehicle models or may require additional expertise to operate.
- Safety gloves and goggles: Whenever you work on your vehicle, it is critical to prioritize your safety. Wearing safety gloves and goggles protects your hands and eyes from potential injuries. These protective gear items should be worn throughout the calibrating process to prevent any accidents or mishaps.
Remember to gather these essential tools before starting the calibration process. Having the necessary equipment will ensure that you can carry out the calibration effectively and without any interruptions. In the next sections, we will guide you through the step-by-step process of calibrating the blend door actuator in your vehicle.
Stay tuned!
Step-By-Step Guide: How To Calibrate Blend Door Actuator
Is the temperature control in your vehicle not functioning properly? The blend door actuator may be the culprit. Calibrating the blend door actuator is a simple process that can restore the proper functioning of your vehicle’s hvac system. In this step-by-step guide, we’ll walk you through the process of calibrating the blend door actuator to help you get your vehicle’s temperature control back on track.
Turn Off The Vehicle’S Engine And Disconnect The Battery
Before you begin the calibration process, ensure that the vehicle’s engine is turned off and the battery is disconnected. This step is crucial in ensuring your safety and preventing any electrical mishaps.
Locate The Blend Door Actuator
The blend door actuator is typically located behind the dashboard on the driver’s side of the vehicle. It is a small device responsible for controlling the airflow and temperature inside the cabin. Take some time to locate the actuator before proceeding to the next steps.
Remove The Faulty Actuator
Once you’ve located the blend door actuator, it’s time to remove the faulty one. Here’s how you can do it:
- Begin by disconnecting the electrical connector attached to the actuator.
- Next, remove the mounting screws that secure the actuator in place.
- Carefully take out the faulty actuator from its position, making sure not to damage any surrounding components.
Install The New Actuator
With the faulty actuator out of the way, it’s time to install the new one. Follow these steps:
- Position the new actuator in the same spot where the old one was.
- Secure the actuator in place by tightening the mounting screws.
- Reconnect the electrical connector to the new actuator, ensuring a secure connection.
Connect The Battery And Start The Vehicle
Now that the new blend door actuator is in place, it’s time to reconnect the battery. Follow these steps:
- Reconnect the negative terminal of the battery and tighten it securely.
- Turn the ignition on and start the vehicle to allow the hvac system to initialize.
Calibrate The Actuator Using The Hvac Control Panel
After starting the vehicle, it’s time to calibrate the new blend door actuator using the hvac control panel. The calibration process may vary depending on the make and model of your vehicle. Refer to your vehicle’s manual for specific instructions on performing the calibration.
Generally, it involves the following steps:
- Access the hvac control panel from the dashboard.
- Follow the manufacturer’s instructions to initiate the actuator calibration mode.
- Ensure that each mode and temperature setting is functioning properly by adjusting the controls manually.
- Once the calibration is complete, verify that the blend door actuator is functioning correctly by testing the temperature control settings.
By following this step-by-step guide, you can easily calibrate the blend door actuator in your vehicle. Proper calibration will help restore the functionality of your hvac system, allowing you to maintain the desired temperature inside your vehicle. Remember to consult your vehicle’s manual for specific instructions and refer to professional help if needed.
Troubleshooting Common Calibration Issues

If you are experiencing issues with your blend door actuator calibration, don’t worry! We’ve got you covered. In this section, we will address some common problems that may arise during the calibration process. Whether your actuator is not responding, the temperature readings are incorrect, or you have a dual-zone system that requires recalibration, we have the solutions you need.
Actuator Not Responding To The Calibration Process
Sometimes, despite following the calibration instructions diligently, your blend door actuator may not respond as expected. This can be frustrating, but there are a few things you can try to troubleshoot the issue:
- Check the power source: Ensure that the actuator is receiving sufficient power. Check the fuse or circuit breaker associated with the actuator and make sure it is not blown or tripped.
- Inspect the wiring: Examine the wiring connections between the actuator and the control module. Look for any loose or damaged wires that may be causing the issue. If you find any, repair or replace them as necessary.
- Reset the system: In some cases, resetting the hvac system may solve the problem. Locate the fuse or disconnect the battery for a few minutes, then reconnect it to reboot the system. This may trigger the actuator to respond to the calibration process.
Incorrect Temperature Readings After Calibration
After calibrating your blend door actuator, you might notice that the temperature readings on your hvac system are inaccurate. To address this issue, consider the following troubleshooting steps:
- Check the actuator positioning: Ensure that the actuator is properly installed and positioned according to the manufacturer’s instructions. Adjust the actuator if necessary, making sure it is correctly aligned with the blend door.
- Verify sensor functionality: Temperature readings rely on accurate input from sensors. Inspect the sensors associated with the actuator and make sure they are functioning correctly. Clean or replace any faulty sensors to rectify any discrepancies in temperature readings.
- Perform a recalibration: If all else fails, try recalibrating the blend door actuator one more time. Sometimes, a second calibration can resolve any lingering issues with temperature readings.
Recalibrating Multiple Actuators In Dual-Zone Systems
If you have a dual-zone hvac system with multiple blend door actuators, you may need to recalibrate each actuator individually. This is important to ensure that both zones are functioning optimally. Here’s how you can tackle this task efficiently:
- Identify the actuators: Locate each blend door actuator in your dual-zone system. They are usually found behind the dashboard, near the hvac air distribution module.
- Disconnect power to each actuator: Disconnect the power source, either by removing the fuse associated with each actuator or disconnecting the battery.
- Calibrate each actuator separately: Follow the manufacturer’s instructions to calibrate each actuator individually. This will ensure that the settings for both zones are properly calibrated, allowing for accurate temperature control.
By troubleshooting these common calibration issues, you can effectively ensure that your blend door actuator is functioning optimally. Remember to follow the manufacturer’s instructions and consult a professional if you encounter any challenges during the process. Keep your hvac system in top-notch condition for a comfortable and enjoyable driving experience.
Tips And Precautions For Successful Calibration
Calibrating the blend door actuator in your vehicle is an essential task to ensure proper functioning of the heating, ventilation, and air conditioning (hvac) system. It allows for seamless control of the temperature inside the cabin, providing comfort during your drive.
To help you navigate the calibration process smoothly, here are some tips and precautions to keep in mind:
Double-Check All Electrical Connections
Before starting the calibration, it is crucial to ensure that all electrical connections related to the blend door actuator are securely fastened. Loose or faulty connections can lead to inaccurate calibration results or even system malfunctions. Take a moment to inspect the connections, making sure they are tight and free from any signs of damage.
Double-checking this simple step can save you time and trouble down the line.
Avoid Excessive Force When Removing Or Installing Actuators
When dealing with the blend door actuators, it’s important to handle them with care. Excessive force can cause damage, leading to incorrect calibration or even the need for replacement. Take your time and gently maneuver the actuators during the removal and installation process.
Applying just the right amount of pressure will help preserve their functionality and avoid any unnecessary mishaps.
Take Note Of The Actuator’S Position Before Removing It
Each blend door actuator has a specific position within the hvac system. To ensure proper calibration, it’s essential to take note of the actuator’s position before removing it. This reference point will help you align the new actuator correctly during the installation process.
It’s a simple step that can make a significant difference in achieving successful calibration and overall system performance.
Refer To The Vehicle’S Manual For Specific Instructions
While the general concept of calibrating a blend door actuator applies to most vehicles, it’s essential to consult your vehicle’s manual for specific instructions. Different car models may have variations in the calibration process or additional steps to follow. By referencing the manual, you can ensure that you are performing the calibration correctly for your particular vehicle, avoiding any unnecessary troubleshooting or potential errors.
Remember, the proper calibration of blend door actuators is crucial for maintaining a comfortable cabin temperature. By following these tips and taking the necessary precautions, you can successfully calibrate your blend door actuator and enjoy a well-functioning hvac system in your vehicle.
Faqs About Calibrating Blend Door Actuator
Can I Calibrate The Actuator Without Disconnecting The Battery?
When it comes to calibrating the blend door actuator, one common question is whether it can be done without disconnecting the battery. Here are some key points to consider:
- Yes, it is possible to calibrate the actuator without disconnecting the battery in some cases. However, it is recommended to disconnect the battery before performing any calibration to avoid potential electrical issues or damage to the actuator.
- Disconnecting the battery ensures that there is no power running through the system, which can help prevent any potential mishaps during the calibration process.
- In certain scenarios, such as when accessing the actuator requires dismantling the dashboard, disconnecting the battery becomes mandatory for safety reasons.
- If you decide to calibrate the blend door actuator without disconnecting the battery, it is crucial to follow the manufacturer’s instructions carefully and be cautious throughout the process.
Do I Need Special Tools To Calibrate The Blend Door Actuator?
To calibrate the blend door actuator, you may require some specific tools. Here are a few points to consider:
- The tools required for calibrating the blend door actuator may vary depending on the make and model of your vehicle. It is essential to consult the vehicle’s manual or a professional mechanic to determine the exact tools needed.
- Common tools that might be required for calibration include a wrench, screwdriver, multimeter, scan tool, and possibly a trim removal tool.
- It is recommended to have a service or repair manual for your vehicle on hand, as it will provide specific instructions and lists of required tools for calibrating the blend door actuator.
- If you are unsure about which tools are necessary or how to use them properly, it is advisable to seek assistance from a qualified mechanic or a professional workshop.
What Are The Potential Risks Of Not Calibrating The Actuator?
Neglecting to calibrate the blend door actuator in your vehicle can have various potential risks. Here are some key points to consider:
- Incorrect temperature control: If the blend door actuator is not calibrated correctly, it may result in incorrect temperature control. This can lead to discomfort for both the driver and passengers, especially in extreme weather conditions.
- Malfunctioning hvac system: Without proper calibration, the actuator may not function optimally, leading to issues with the heating, ventilation, and air conditioning (hvac) system. This can result in inadequate airflow, reduced cooling or heating capacity, and potential damage to other components.
- Increased energy consumption: An improperly calibrated blend door actuator can cause the hvac system to work harder than necessary to maintain the desired temperature. This can lead to increased fuel or energy consumption, resulting in higher operational costs and reduced efficiency.
- Potential damage to the actuator: Continuing to use an actuator that has not been calibrated properly can put excessive strain on its mechanical components. Over time, this can lead to premature wear and tear, reducing the actuator’s lifespan and potentially requiring costly repairs or replacement.
Although it may be possible to calibrate the blend door actuator without disconnecting the battery, it is recommended to do so for safety reasons. Special tools may be required depending on your vehicle, and neglecting to calibrate the actuator can result in various risks such as incorrect temperature control, hvac malfunctions, increased energy consumption, and potential damage to the actuator itself.
It is always best to follow the manufacturer’s instructions or consult a professional to ensure proper calibration and optimal performance of the blend door actuator.
Frequently Asked Questions On How To Calibrate Blend Door Actuator
How Do I Know If My Blend Door Actuator Is Not Working Properly?
If you notice that the temperature in your vehicle is not adjusting correctly, or you hear clicking noises behind the dashboard, it may be a sign that your blend door actuator is malfunctioning.
Can I Calibrate The Blend Door Actuator Myself?
Yes, you can calibrate the blend door actuator yourself by following a few simple steps. This can help fix temperature control issues in your vehicle.
What Tools Do I Need To Calibrate The Blend Door Actuator?
To calibrate the blend door actuator, you will need a screwdriver, a wrench, and possibly a multimeter, depending on the specific vehicle and actuator.
How Often Should I Calibrate The Blend Door Actuator?
Calibrating the blend door actuator is typically not a regular maintenance task. It is usually only necessary if you are experiencing temperature control issues in your vehicle.
Can A Blend Door Actuator Be Repaired Or Does It Need To Be Replaced?
In some cases, a blend door actuator can be repaired if the issue is minor. However, if the actuator is severely damaged or not working properly, it may need to be replaced for optimal functionality.
Conclusion
Learning how to calibrate a blend door actuator is crucial for maintaining the optimal performance of your vehicle’s heating and cooling system. By following the steps outlined in this blog post, you can ensure that the blend door actuator is properly aligned and responsive to temperature changes, resulting in a comfortable driving experience.
Regular calibration can prevent issues such as incorrect temperature control, weak airflow, or excessive noise from the heating and cooling system. Additionally, understanding how to calibrate the blend door actuator can save you time and money by avoiding unnecessary repairs or replacements.
Remember to consult your vehicle’s manual for specific instructions and seek professional help if needed. By taking the time to calibrate your blend door actuator, you can enhance the overall efficiency and longevity of your vehicle’s climate control system.
- How Much Does a Ford 9N Tractor Weigh - May 20, 2024
- How Many of My Exact Car were Made: Uncovering the Rarity - May 20, 2024
- How to Find Out What Someone Drives: Discover the Truth - May 20, 2024