To dig a pond with a tractor, first, clear the area of debris and mark the pond’s perimeter. Next, use the tractor to excavate the pond by removing soil to the desired depth.
Creating a pond with a tractor can be an efficient and practical way to enhance your property. It offers benefits such as providing water storage, attracting wildlife, and enhancing the aesthetic appeal of your landscape. By following the right steps and using the appropriate equipment, you can successfully dig a pond with a tractor.
In this guide, we will explore the necessary tools and techniques needed to complete this project effectively. Let’s dive into the process of creating a pond on your property with your trusty tractor.

Credit: permies.com
Choosing The Right Tractor
When it comes to digging a pond with a tractor, choosing the right equipment is crucial for the success of your project. The right tractor can make the process efficient and effective, while the wrong one can lead to unnecessary complications and delays. Here are some key factors to consider when selecting the right tractor for digging a pond.
Consider The Size Of The Pond
Before choosing a tractor, carefully evaluate the size of the pond you want to dig. The dimensions of your pond will determine the size and power of the tractor needed for the job. A smaller pond may only require a compact or subcompact tractor, while a larger pond will necessitate a more powerful and robust machine.
Evaluate The Tractor’s Power And Capabilities
Assess the horsepower and capabilities of the tractor to ensure it aligns with the requirements of the pond-digging project. Consider the tractor’s lifting capacity, hydraulic power, and attachments such as backhoes or loaders. A tractor with sufficient power and capabilities can effectively handle the excavation and earthmoving tasks involved in pond construction.
Preparing The Site
Clear The Area Of Any Obstacles
Before beginning the excavation, it is crucial to ensure the work area is devoid of any obstructions.
- Remove rocks, debris, and any vegetation that could impede the digging process.
- Check for underground utilities to avoid any accidents or disruptions during excavation.
Mark The Boundaries Of The Pond
Outline the desired shape and size of the pond to provide a clear guideline for the excavating process.
- Using stakes and string, mark the perimeter of the pond, ensuring it matches the planned dimensions.
- Double-check the boundaries to ensure they are accurate and align with your vision for the pond.
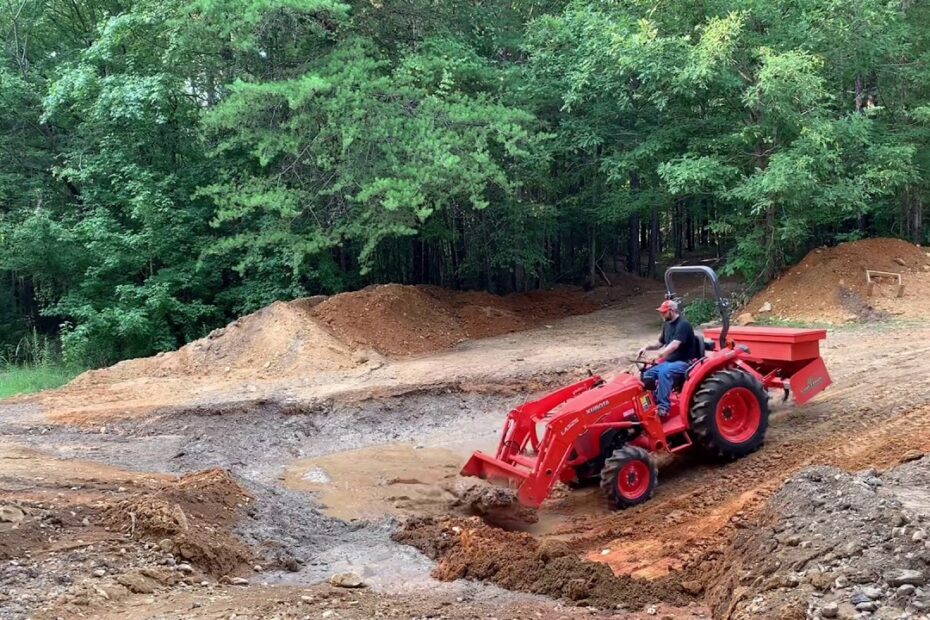
Excavating The Pond
Digging a pond with a tractor? Learn the essentials of excavating a pond using a tractor, from choosing the right equipment to following the necessary steps for a successful dig. Discover expert tips and guidance to create your dream pond.
Start With The Outer Perimeter
Begin by marking the area bold where you want to dig the pond. Proceed by digging the outer edges bold of the pond to create a defined boundary. This step will help prevent erosion and maintain the shape of the pond.
Dig Out The Center Of The Pond
Once you have established the outer boundary, it’s time to excavate the center of the pond. Use the tractor to dig out the center, ensuring uniform depth. Remove the soil and debris to clear the area effectively. This process helps shape the pond and create a proper waterbody.
Sculpting The Pond
When it comes to sculpting the pond, proper design and structure are crucial for creating a healthy and visually appealing aquatic environment. The process of sculpting the pond involves creating varying depths and shaping the sides and bottom to ensure optimal functionality and aesthetic appeal.
Create Varying Depths
The first step in sculpting a pond is to create varying depths within the water body, providing suitable habitats for different aquatic species and promoting ecological balance. This can be achieved using a tractor-mounted excavator to dig deeper areas while leaving shallow zones for marginal plants and wildlife.
Shape The Sides And Bottom Of The Pond
Once the depths are established, the next step is to shape the sides and bottom of the pond to enhance its natural appearance and promote water circulation. This involves carefully molding the banks to create gentle slopes and irregular edges, adding interest to the landscape while preventing erosion. Additionally, the bottom can be sculpted to include shelves and ledges that provide refuge for fish and other aquatic organisms.
Finishing Touches

Now that you’ve successfully dug your pond using a tractor, it’s time to add the finishing touches that will give your pond a polished and professional look. Paying attention to these small details will enhance the aesthetic appeal of your pond and ensure its longevity.
Smooth Out The Pond Walls
One important step in completing your pond is to smooth out the walls. Use a shovel or a hand tamper to remove any loose dirt or rocks from the sides of the pond. This will prevent erosion and create a smooth surface that will make it easier to install the pond liner. Smooth walls will also prevent debris from accumulating and potentially clogging the pond.
Install A Pond Liner
Installing a pond liner is crucial to prevent water leakage and maintain the water level in your pond. Start by measuring the dimensions of your pond and cutting the pond liner accordingly. Lay the liner inside the pond, making sure it covers the entire area and extends up the walls. Use rocks or bricks along the edges to secure the liner in place.
Before filling the pond with water, check for any wrinkles or folds in the liner. Smooth them out carefully to ensure a tight fit. Smoothness is essential to prevent the liner from shifting when the pond is filled with water. A wrinkle-free liner will also make it easier to clean and maintain your pond in the long run.
When filling the pond, do it gradually and check for any leaks. If you notice any water seeping through, patch it up immediately using pond repair tape or a pond liner patch kit. Remember to leave some excess liner around the edges to allow for adjustments and expansion in different weather conditions.
Finishing touches may seem minor, but they can make a significant difference in the overall appearance and functionality of your pond. By paying attention to details such as smoothing out the walls and installing a pond liner properly, you can create a stunning and sustainable water feature that will be the centerpiece of your garden for years to come.

Credit: m.youtube.com
Credit: www.whatpond.com
Frequently Asked Questions On How To Dig A Pond With A Tractor
Can You Dig A Pond With Just A Tractor?
Yes, you can dig a pond with just a tractor. A powerful tractor equipped with a backhoe or excavator attachment can efficiently dig a pond. The process requires careful planning and operation to ensure proper shaping and depth. It’s a cost-effective option for small to medium-sized ponds.
What Is The Best Piece Of Equipment To Dig A Pond?
The best equipment to dig a pond is an excavator, specifically a mini excavator for small projects.
How Deep To Dig A Pond To Hold Water?
Dig a pond at least 8-10 feet deep to ensure enough water retention and prevent evaporation.
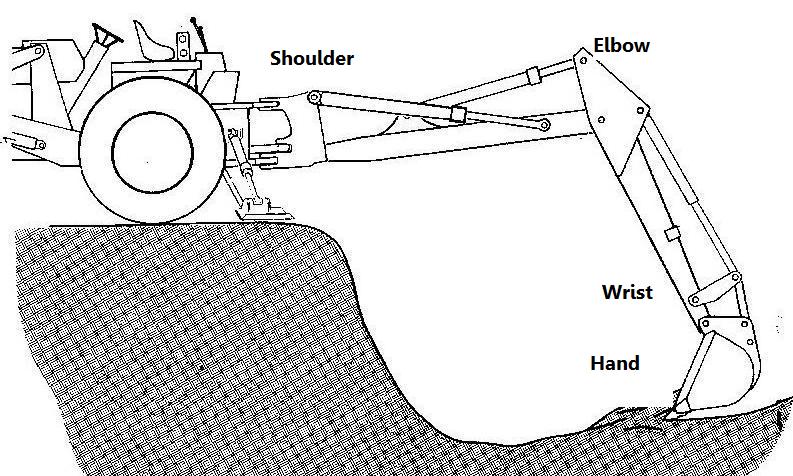
Can You Dig A Hole With A Tractor?
Yes, a tractor can dig a hole using a backhoe attachment. The backhoe has a digging arm with a bucket that can efficiently excavate the ground. This method is commonly used in construction and landscaping projects.
Conclusion
Using a tractor to dig a pond can be a cost-effective and efficient solution. With proper planning and execution, you can create a beautiful and functional water feature on your property. Remember to follow safety precautions and consider environmental regulations.
By following these steps, you can successfully create a pond that enhances the aesthetics and value of your land.
- How Much Does a Ford 9N Tractor Weigh - May 20, 2024
- How Many of My Exact Car were Made: Uncovering the Rarity - May 20, 2024
- How to Find Out What Someone Drives: Discover the Truth - May 20, 2024