To fix an oil pan gasket leak, drain the oil from the pan, remove the bolts holding the pan in place, clean the mating surfaces, and replace the gasket before reattaching the pan and refilling it with oil. When faced with an oil pan gasket leak, it is essential to take immediate action to prevent further damage to your vehicle.
This type of leak can lead to oil loss, which can result in engine damage if left untreated. Fortunately, fixing an oil pan gasket leak is a relatively straightforward process that can be done with a few basic tools and some patience.
We will outline the step-by-step process for fixing an oil pan gasket leak, ensuring that you can address this issue promptly and effectively.
Signs Of A Oil Pan Gasket Leak
Recognizing the signs of an oil pan gasket leak is crucial for maintaining the health of your vehicle. Ignoring this issue can lead to serious engine damage and costly repairs. In this section, we will discuss the three main indications of an oil pan gasket leak: oil spots under the car, a burning smell from the engine, and decreased oil levels.
Oil spots under the car
One of the most common signs of an oil pan gasket leak is the presence of oil spots under your car. If you notice dark, greasy stains on the ground where you typically park your vehicle, this could be an indication that the oil pan gasket is leaking. The oil spots may also have a distinct odor, making them easier to identify. It’s important to address this issue promptly, as leaking oil can damage your engine and contaminate the environment.
Burning smell from the engine
If you detect a burning smell coming from your engine, there is a good chance that it is related to an oil pan gasket leak. As the oil leaks onto hot engine components, it can create a distinct burning odor. This smell may be more noticeable after driving for an extended period or when working your vehicle harder, such as towing. If you experience this smell, it’s essential to take immediate action to prevent further damage to your engine.
Decreased oil levels
Monitoring your vehicle’s oil levels is an important part of regular maintenance. If you find that your oil levels are consistently low, it could be a sign of an oil pan gasket leak. A leaking gasket will allow oil to escape and lead to a gradual decrease in the oil volume. This can result in insufficient lubrication for your engine, causing increased friction and potential damage. Checking and topping up your oil regularly will help you catch any oil leaks early on and prevent more significant issues down the road.
Being aware of these signs of an oil pan gasket leak can save you from potential engine damage and expensive repairs. If you notice oil spots under your car, a burning smell from the engine, or decreased oil levels, it’s crucial to take prompt action. Consult with a professional mechanic to address the issue and get your vehicle back on the road in optimal condition.
Credit: www.felpro.com
List Of Tools
Introduction: List of Tools
When it comes to fixing an oil pan gasket leak, having the right tools is crucial. With the proper tools at your disposal, you can tackle this task with confidence and efficiency. In this section, we will provide you with a comprehensive list of the tools you’ll need to successfully fix an oil pan gasket leak. From socket wrench sets to torque wrenches, we’ve got you covered. Let’s dive right in!Socket Wrench Set
A socket wrench set is an indispensable tool when it comes to fixing an oil pan gasket leak. This set typically includes a handle and a variety of sockets of different sizes, allowing you to easily tighten or loosen bolts and nuts. When choosing a socket wrench set, opt for one with both metric and standard measurements, as this ensures compatibility with the different fasteners you may encounter.Oil Filter Wrench
An oil filter wrench is specifically designed to remove and tighten oil filters. This tool provides a secure grip on the oil filter, allowing you to effortlessly remove it without causing any damage. Be sure to choose an oil filter wrench that is adjustable and can accommodate various sizes of oil filters. This way, you’ll be prepared for different vehicle models and filter types.Scraper or Putty Knife
A scraper or putty knife is an essential tool for removing the old gasket material from the oil pan and engine block. These tools have a flat and sharp edge, making them perfect for scraping away the residue. Ensure that the scraper or putty knife you choose is made of sturdy material and has a comfortable grip, as this will make the task much easier and more efficient.Torque Wrench
A torque wrench is crucial when it comes to tightening the bolts that secure the oil pan. This tool allows you to apply the proper amount of torque, ensuring that the bolts are neither over-tightened nor under-tightened. When selecting a torque wrench, opt for one that is capable of measuring the torque specified by your vehicle’s manufacturer. This will help you avoid any potential damage to the oil pan or gasket. With this comprehensive list of tools, you’re well-prepared to tackle the task of fixing an oil pan gasket leak. Having the right tools will undoubtedly make the process smoother and more efficient. Before you get started, ensure that you have all the necessary tools within arm’s reach. Happy repairing!List Of Materials
When it comes to fixing an oil pan gasket leak, having the right materials is crucial. Properly preparing and gathering the necessary tools will ensure a successful repair. Here is a comprehensive list of the materials you will need:
New oil pan gasket
One of the most important materials you will need for this repair is a new oil pan gasket. It’s essential to choose a high-quality gasket that is compatible with your specific vehicle make and model. A new gasket will provide a secure seal and prevent any further leaks.
Gasket sealer
In addition to the oil pan gasket itself, you will also need a gasket sealer. This sealer is designed to enhance the bond between the gasket and the oil pan, ensuring a leak-free seal. Look for a sealer that is specifically formulated for oil pan gaskets and has excellent adhesion properties.
Engine oil
When performing an oil pan gasket repair, it’s essential to have enough engine oil on hand. As you remove the oil pan, some oil will inevitably drain out, and you will need to refill it once the repair is complete. Check your vehicle’s manual or consult with a trusted mechanic to determine the appropriate type and amount of engine oil required.
Oil filter
Replacing the oil filter is recommended while you’re undertaking an oil pan gasket repair. Over time, oil filters can become contaminated with debris and lose their effectiveness. By installing a new oil filter, you ensure that clean oil is continuously flowing through your engine, promoting optimal performance. Make sure to choose a filter that is compatible with your vehicle’s make and model.
By having these materials readily available, you will streamline the repair process and ensure a successful fix for your oil pan gasket leak.
Draining The Engine Oil
Draining the engine oil is an essential step in fixing an oil pan gasket leak. By removing the old oil, you can inspect the oil pan gasket more effectively and install a new one if necessary.
Park the car on a flat surface
Before you begin the oil draining process, make sure to park your car on a flat surface. This ensures that the oil drains evenly and prevents any accidents or spills.
Place an oil drain pan below the oil pan
Once the car is parked, position an oil drain pan directly underneath the oil pan. The drain pan will catch the oil as it is drained, preventing it from making a mess on the ground or other parts of the car.
Use a socket wrench to remove the oil drain plug
Locate the oil drain plug on the oil pan. It is usually located at the bottom of the pan and secured with a bolt or plug. To remove it, use a socket wrench that fits the size of the plug. Position the drain pan to catch the oil.
Note: Be cautious as the oil may be hot, so it’s recommended to wear protective gloves while performing this task.
Let the oil drain completely
Once the drain plug is removed, let the oil drain completely from the oil pan. Ensure that the oil flows steadily into the drain pan. To ensure a thorough drain, you may need to wait for a few minutes until the oil stops trickling.
Note: It is always a good practice to follow the manufacturer’s recommendations for the duration of oil draining.
After following these steps, you will have successfully drained the engine oil from your car. This process will allow you to move forward with inspecting and fixing the oil pan gasket leak.
Removing The Oil Pan

Removing the oil pan is an essential step in fixing an oil pan gasket leak. This process involves removing any parts that may be blocking access to the oil pan, using a socket wrench to remove the oil pan bolts, and gently prying the oil pan to detach it from the engine block. Let’s go over each step in detail:
Remove any parts blocking access to the oil pan
In some cases, there may be parts, such as exhausts or skid plates, that are blocking direct access to the oil pan. Before attempting to remove the oil pan, it’s crucial to remove these parts to ensure easy and hassle-free access. To do this:
- Locate the parts that are obstructing access to the oil pan.
- Use the appropriate tools, such as a wrench or a screwdriver, to loosen and remove any bolts or screws that are holding these parts in place.
- Once all the necessary bolts or screws are removed, carefully remove the obstructing parts and set them aside safely.
Use a socket wrench to remove the oil pan bolts
Now that the obstructing parts are out of the way, it’s time to remove the oil pan bolts. For this step, a socket wrench is the perfect tool. Follow these steps:
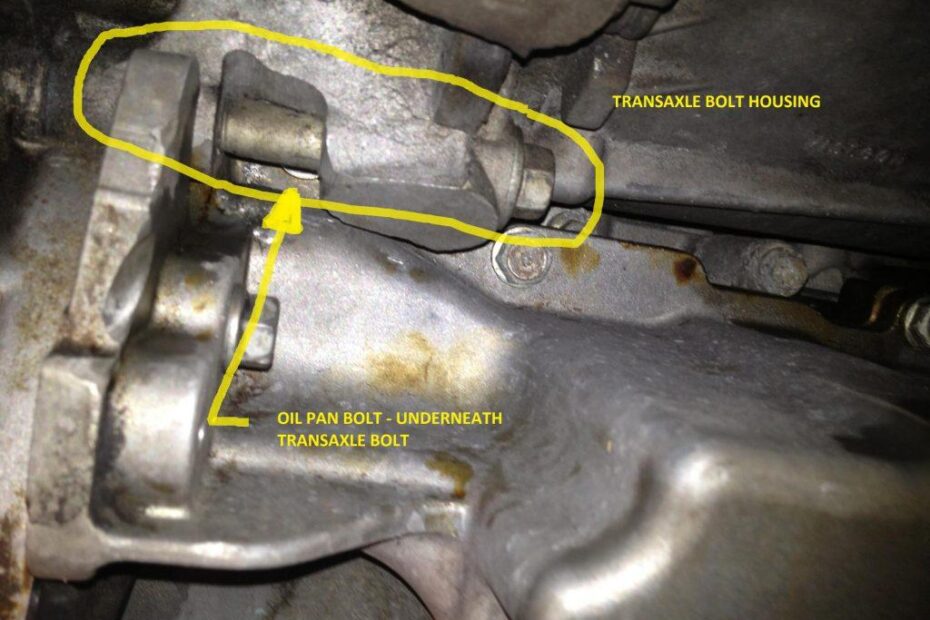
- Identify the oil pan bolts located around the perimeter of the oil pan.
- Attach the appropriate socket size to your socket wrench that matches the bolts snugly.
- Using the socket wrench, turn each bolt counterclockwise to loosen and remove them. Be sure to keep the bolts in a safe place as you will need them later when installing the new gasket.
Gently pry the oil pan to detach it from the engine block
With the bolts removed, it’s time to detach the oil pan from the engine block. This step requires finesse to avoid damaging any components. Follow these steps:
- Using a flat screwdriver or a prying tool, carefully insert the tool between the oil pan and the engine block.
- Gently apply pressure to pry the oil pan away from the engine block. Take your time and work your way around the oil pan to ensure even separation.
- Once the oil pan is detached, remove it from the engine block and set it aside.
Congratulations! You have successfully removed the oil pan. At this point, you can inspect the oil pan gasket for any signs of damage or wear. If necessary, replace the gasket before reassembling the oil pan. Stay tuned for our next article, where we will cover installing a new oil pan gasket and reattaching the oil pan.
Cleaning The Oil Pan And Engine Block
Before installing a new gasket, it is crucial to clean the oil pan and engine block surfaces thoroughly. This step ensures a proper seal and helps prevent any leaks in the future.
Use a scraper or putty knife to remove the old gasket and sealant
Start by using a scraper or putty knife to carefully remove the old gasket and any remaining sealant from both the oil pan and the engine block. This process ensures a clean surface for the new gasket to adhere to.
Tip: Be gentle while scraping to avoid damaging the surfaces. Take your time and remove all traces of the old gasket and sealant.
Clean the oil pan and engine block surfaces thoroughly
Once the old gasket and sealant are removed, it’s time to clean the oil pan and engine block surfaces thoroughly. Use a suitable solvent or engine degreaser and a clean cloth or brush to remove any dirt, grime, or oil residue.
Tip: Ensure that the surfaces are completely dry before proceeding to the next step. Any moisture left behind can interfere with the gasket’s ability to form a tight seal.
Apply gasket sealer to both surfaces before installing the new gasket
Before installing the new gasket, it is essential to apply a thin layer of gasket sealer to both the oil pan and engine block surfaces. This additional step helps create a strong and reliable seal, further reducing the chances of any future leaks.
Tip: Follow the manufacturer’s instructions on the gasket sealer product for the best results. Apply the sealer evenly and allow it to dry or cure according to the specified time.
Once the gasket sealer is applied and dry, you can proceed to install the new gasket. Make sure to align the bolt holes correctly and tighten the bolts to the manufacturer’s recommended torque specifications. With a properly cleaned and sealed oil pan and engine block, you can enjoy a leak-free engine and have peace of mind.
Installing The New Oil Pan Gasket
Once you’ve successfully removed the old oil pan gasket, it’s time to install the new one. This step is crucial in ensuring a tight seal and preventing any oil leaks in the future. Follow these instructions to properly install the new oil pan gasket:
Carefully align the new gasket with the oil pan and engine block
To start, take the new oil pan gasket and carefully align it with both the oil pan and the engine block. Make sure all the bolt holes and edges are properly lined up for a seamless fit. Take your time during this step to ensure the gasket is positioned correctly.
Press the gasket firmly into place, ensuring a tight seal
After aligning the gasket, firmly press it into place to create a tight seal. Apply even pressure throughout the gasket, making sure it adheres to both the oil pan and engine block. This step is crucial in preventing any oil leaks that could occur if the gasket isn’t properly seated.
Replace the oil pan and secure it with the bolts
Once the gasket is securely in place, it’s time to reattach the oil pan. Carefully position the oil pan over the gasket, making sure it lines up with the bolt holes on the engine block. Once aligned, begin securing the oil pan with the bolts. Make sure each bolt is tightened evenly to avoid any gaps or uneven pressure that could compromise the seal.
Torque the bolts to the manufacturer’s specifications
Lastly, it’s important to torque the bolts to the manufacturer’s specifications. This ensures that each bolt is tightened to the appropriate level, providing the optimal seal and preventing any oil leaks. Consult your vehicle’s manual or the manufacturer’s recommended torque settings to determine the correct amount of torque for each bolt.
In conclusion, installing the new oil pan gasket requires careful alignment, firm pressing for a tight seal, secure attachment of the oil pan with bolts, and torquing the bolts to the appropriate specifications. Following these steps will help fix the oil pan gasket leak and ensure a proper seal, ultimately maintaining the integrity of your vehicle’s oil system.
Refilling The Engine Oil
After successfully replacing the oil pan gasket and ensuring a secure seal, it is time to top up your engine with fresh oil. Refilling the engine oil is a crucial step in fixing an oil pan gasket leak as it ensures proper lubrication and prevents engine damage. Follow the steps below to effectively refill the engine oil.
Insert a new oil filter and secure it with an oil filter wrench
The first step in refilling the engine oil is to replace the old oil filter with a new one. The oil filter removes contaminants from the oil, ensuring the engine remains clean and efficient. To insert a new oil filter:
- Locate the oil filter housing, which is usually located near the engine.
- Remove the old oil filter by turning it counterclockwise using an oil filter wrench.
- Once the old filter is removed, take a new oil filter and apply a thin coat of fresh oil to the gasket to ensure a tight seal.
- Thread the new oil filter into place, turning it clockwise until it is snug. Be careful not to overtighten.
- Use an oil filter wrench to secure the new oil filter, ensuring it is properly tightened.
Pour fresh engine oil into the engine
Now that the new oil filter is in place, it’s time to pour fresh engine oil into the engine. Follow these steps:
- Locate the oil filler cap, which is usually marked with an oil can symbol and is located at the top of the engine.
- Remove the oil filler cap and set it aside in a safe place.
- Place a funnel into the oil filler hole to prevent spillage.
- Carefully pour the recommended amount of fresh engine oil into the engine. Refer to your vehicle’s manual or consult with a professional to determine the correct oil type and quantity. Lower viscosity oils are usually recommended for better fuel economy.
- After pouring the engine oil, remove the funnel and wipe away any spills or drips before replacing the oil filler cap.
Check the oil level using the dipstick and add more if necessary
Once the fresh engine oil has been poured, it is important to check the oil level to ensure it is within the recommended range. To do this:
- Locate the oil dipstick, usually marked with a brightly colored handle and located near the engine block.
- Remove the dipstick and wipe it clean with a lint-free cloth or paper towel.
- Slowly insert the dipstick back into the dipstick tube until it is fully seated.
- Remove the dipstick again and observe the oil level. The dipstick will usually have markings indicating the minimum and maximum oil levels.
- If the oil level is below the minimum mark, add more oil and repeat the checking process until the oil level is within the recommended range.
- Ensure the dipstick is securely inserted and replace the oil filler cap.
Congratulations! You have successfully refilled the engine oil after fixing an oil pan gasket leak. It is crucial to regularly check and maintain the engine oil level to ensure optimal engine performance and longevity. Remember to dispose of the used oil and filter in an environmentally responsible manner.
Starting The Engine
Starting the Engine Once you have completed the necessary steps to fix the oil pan gasket leak, it’s time to start the engine and ensure everything is running smoothly. This crucial step will allow you to inspect the oil pan and surrounding areas for any signs of leaks. Let’s dive right into it and see how to start the engine and check for any potential issues.Start the engine and let it run for a few minutes
To initiate the engine, make sure you are in a well-ventilated area, free from any obstructions. Insert your key into the ignition and turn it to start the engine. The engine should fire up, and you will hear the familiar purr of your vehicle. Allow the engine to run for a few minutes to warm up and stabilize.Inspect the oil pan and surrounding areas for any signs of leaks
While the engine is running, it’s time to inspect the oil pan and its surrounding areas for any signs of leaks. Carefully examine the bottom part of the engine where the oil pan is located. Look for any oil drips, puddles, or dampness on the ground or the oil pan itself. Additionally, check for any visible oil spots on the engine parts that indicate a leak. If you notice any leaks, it’s crucial to address them promptly to prevent further damage and maintain the optimal performance of your vehicle.If there are no leaks, turn off the engine
After conducting a thorough inspection and ensuring that no leaks are present, it’s time to turn off the engine. This will help conserve energy and prevent any accidents or mishaps. To turn off the engine, simply remove the key from the ignition and let the engine come to a complete stop. It’s essential to follow this step to keep your vehicle in good working condition and avoid any unnecessary complications. In conclusion, starting the engine after fixing an oil pan gasket leak is an essential step to verify that the repair was successful. By letting the engine run for a few minutes and inspecting the oil pan and surrounding areas for leaks, you can ensure that your vehicle is operating smoothly. Remember to turn off the engine if no leaks are present, and proceed to enjoy a leak-free and properly functioning car.Cleaning Up And Proper Disposal
After successfully fixing the oil pan gasket leak in your vehicle, it is important to properly clean up any spilled oil or debris and dispose of the old oil and filter in an environmentally friendly manner. Taking these steps ensures that you not only maintain a clean working environment but also contribute to the preservation of our planet. In this section, we will guide you through the process of cleaning up any spills and ensuring that the old oil and filter are disposed of responsibly.
Clean up any spilled oil or debris
If you accidentally spill oil or encounter any debris during the repair process, it is crucial to clean it up promptly and properly. Ignoring the spill can lead to slippery surfaces, which may pose a safety risk. To effectively clean up spilled oil or debris, follow these steps:
- Contain the spill: Use absorbent materials such as oil absorbent pads, cat litter, or sawdust to contain the spilled oil. Place the absorbent material around the spill to prevent it from spreading.
- Collect the spilled oil: Carefully scoop or use a plastic squeegee to collect the spilled oil and place it in a suitable container. Avoid using materials that may react with or contaminate the oil, such as cloth or paper towels.
- Clean the affected area: Use dish soap or a degreaser to clean the affected area thoroughly. Scrub gently with a brush or sponge to remove any remaining oil residue. Rinse the area with water and ensure it is completely dry.
- Dispose of the materials: Seal the used absorbent material and any contaminated items in a plastic bag or container. Check local regulations for proper disposal guidelines and take them to an approved waste facility.
Dispose of the old oil and filter properly at a recycling center
Proper disposal of used oil and oil filters is crucial for protecting the environment. Rather than dumping them in the trash or pouring them down the drain, follow these steps to dispose of them responsibly:
- Drain the oil: Place a suitable container under the oil pan and remove the drain plug to drain the old oil completely. Allow sufficient time for the oil to flow out.
- Remove the oil filter: Use an oil filter wrench to loosen and remove the old oil filter. Ensure that any remaining oil in the filter is drained into the container.
- Collect the old oil and filter: Pour the drained oil into a clean, leak-proof container. Place the used oil filter in a plastic bag to prevent any residual oil from leaking.
- Find a recycling center: Locate a recycling center or collection facility in your area that accepts used oil and filters. Check with your local government or visit websites like earth911.com to find the nearest recycling options.
- Drop off the oil and filter: Take the collected oil and filter to the recycling center for proper disposal. Be sure to follow any specific requirements or guidelines provided by the facility.
By taking the extra time to clean up spills and dispose of old oil and filters correctly, you are doing your part in minimizing the impact on the environment. Remember, responsible disposal not only protects our ecosystem and waterways but also sets a good example for others. Together, let’s strive for a cleaner, greener future!
Regular Maintenance Tips To Prevent Oil Pan Gasket Leaks
Regular maintenance is key to preventing oil pan gasket leaks, which can lead to costly repairs and potential damage to your vehicle’s engine. By following these simple tips, you can extend the life of your oil pan gasket and keep your engine running smoothly.
Keep up with regular oil changes
One of the most important steps in preventing oil pan gasket leaks is to maintain a regular oil change schedule. Changing your engine oil at the recommended intervals helps to keep it clean and free from contaminants that can cause gasket degradation and leaks. Make sure to use the manufacturer’s recommended oil grade and viscosity to ensure optimal performance.
Inspect the oil pan and gasket for signs of wear and damage
Regularly inspecting your oil pan and gasket for signs of wear and damage is crucial in preventing leaks. Look for any visible cracks, gaps, or oil stains around the oil pan area. Additionally, inspect the gasket for brittleness or deterioration. If you notice any signs of wear or damage, it’s important to address the issue promptly to prevent further complications.
Use high-quality engine oil and filters
Choosing the right engine oil and filters is essential in maintaining the health of your oil pan gasket. Using high-quality engine oil with proper additives can help prolong the life of the gasket and prevent leaks. Additionally, using reputable oil filters can ensure that no harmful contaminants enter your engine, which can contribute to gasket degradation.
By adhering to these regular maintenance tips, you can significantly reduce the risk of oil pan gasket leaks and keep your engine in optimal condition. Remember, prevention is always better than cure, and a little effort now can save you from costly repairs down the road. Stay proactive and give your vehicle the care it deserves!
Frequently Asked Questions On How To Fix Oil Pan Gasket Leak
How Much Does It Cost To Fix A Oil Pan Gasket Leak?
Fixing an oil pan gasket leak can cost around $200 to $500, depending on the vehicle make and model. It’s important to address this issue promptly to prevent further engine damage.
Can You Seal A Leaking Oil Pan?
Yes, it is possible to seal a leaking oil pan. Using a high-quality sealant specifically designed for oil pans can help stop the leak and prevent further damage. It is important to clean the surface properly before applying the sealant for a better result.
Can You Patch An Oil Pan Gasket Leak?
Yes, you can patch an oil pan gasket leak by using a sealant designed for this purpose. Apply the sealant to the affected area of the gasket, following the instructions carefully. However, it’s essential to keep in mind that this is a temporary solution and it’s recommended to replace the gasket for a long-term fix.
How Serious Is An Oil Pan Gasket Leak?
An oil pan gasket leak can be a serious issue as it leads to oil loss, which can damage the engine. It should be fixed promptly to prevent further damage and maintain the engine’s performance.
How Do I Know If My Oil Pan Gasket Is Leaking?
If you notice oil spots under your car, a decrease in oil levels, or engine overheating, it may indicate an oil pan gasket leak.
Can I Drive With A Leaking Oil Pan Gasket?
It is not recommended to drive with a leaking oil pan gasket as it can lead to low oil levels and potential engine damage.
How Long Does It Take To Fix An Oil Pan Gasket Leak?
The time required to fix an oil pan gasket leak can vary depending on the severity of the leak and the skill level of the mechanic, but it generally takes a few hours to a full day.
Conclusion
To summarize, fixing an oil pan gasket leak is a manageable task that can save you time and money. By following the step-by-step guide outlined in this blog post, you can successfully repair the leak on your own. Remember to gather the necessary tools, drain the oil, clean the area thoroughly, and apply a new gasket.
Regular inspection and maintenance will help prevent future leaks and ensure the smooth functioning of your vehicle’s engine. Happy repairing!
- How Much Does a Ford 9N Tractor Weigh - May 20, 2024
- How Many of My Exact Car were Made: Uncovering the Rarity - May 20, 2024
- How to Find Out What Someone Drives: Discover the Truth - May 20, 2024