
To remove a tractor tire from a rim, first deflate the tire completely, then use tire irons. Removing a tractor tire from a rim may seem daunting at first, but with the right tools and proper technique, it can be done efficiently.
By following these steps, you can successfully detach the tire from the rim, allowing for any necessary repairs or replacements. Whether you are a seasoned professional or a DIY enthusiast, knowing how to remove a tractor tire from a rim is a valuable skill that can save you time and money in the long run.
With a bit of patience and the right approach, you can tackle this task with confidence and precision.
Tools You Will Need
When removing a tractor tire from a rim, having the right tools is essential to make the task easier and more efficient. The process involves loosening and removing the tire from the rim, which may require some force and precision. Below, we’ll outline the tools you will need to successfully remove a tractor tire from the rim.
Wrench
A wrench is a must-have tool for removing a tractor tire from the rim. It’s used to loosen the bolts or nuts that secure the tire onto the rim. Be sure to select the appropriate size of the wrench to fit the bolts or nuts on your specific tractor tire.
Tire Iron
A tire iron is an essential tool for prying the tire off the rim. It provides leverage and helps to separate the tire from the rim. When using a tire iron, be careful to avoid damaging the tire or rim, and work around the tire gradually to ensure it comes off evenly.
Hammer
A hammer can be useful for tapping the tire iron or providing additional force when removing a stubborn tractor tire from the rim. It helps to dislodge the tire from the rim and can make the process smoother. Use it cautiously to avoid causing any damage to the rim or tire.

Credit: www.wikihow.com
Preparing The Area
Remove a tractor tire from its rim by first preparing the area. This involves deflating the tire, lifting the tractor, and placing it on jack stands.
Find A Flat Surface
Locate a level ground surface to work on for ease and stability.
Secure The Rim
Ensure the rim is firmly held in place during the tire removal process.
Loosening The Beads
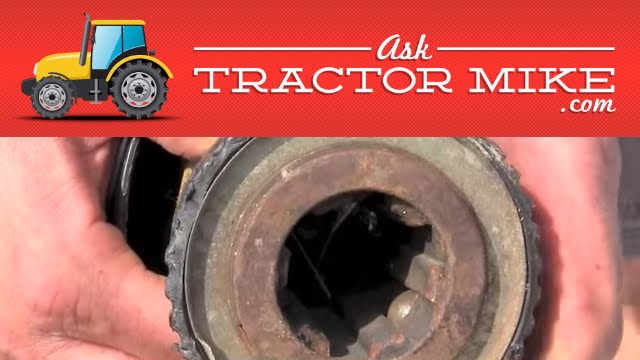
Loosening the beads of a tractor tire is the first step in removing it from the rim. This process helps to separate the tire from the rim for easier removal.
Deflate The Tire
Start by using a valve stem removal tool to deflate the tire completely. This will release any pressurized air inside the tire.
Use A Tire Iron
Slide a tire iron between the tire bead and the rim. Pry the tire iron back and forth to break the seal between the tire bead and the rim.
Alternate Sides
Continuously work your way around the tire, using the tire iron to loosen the beads on alternate sides until the tire is fully separated from the rim.
“` This is a brief and easy-to-understand explanation of how to loosen the beads of a tractor tire, incorporating specific steps and techniques essential for the process.

Credit: www.youtube.com
Removing The Tire
Removing a tractor tire from its rim can be a challenging task, but with the right tools and technique, it can be done efficiently. Here are the steps to remove a tire from the rim to effectively carry out maintenance or repairs.
Use Tire Iron To Pry Off The Tire
To start the process, position the tire iron between the rim and the tire bead. Slowly lever the tire iron to pry off the tire from the rim. Be cautious to avoid damaging the rim and apply steady pressure to loosen the tire bead from the rim. This step may require some effort, so it’s important to take your time and ensure the tire iron is securely positioned to prevent slippage.
Slide Tire Off Rim
Once the tire bead is loosened, carefully slide the tire off the rim. Push the tire in an outward motion, working it off the rim little by little. This may be a gradual process, and it’s crucial to exercise patience to avoid damaging the tire or the rim. Check for any remaining obstructions and continue sliding the tire off until it is completely separated from the rim, allowing for easier maintenance or replacement.
Finishing Up
Once you have successfully removed the tractor tire from the rim, there are a few final steps you should take to ensure everything is in good condition and ready for use. Make sure to follow these essential finishing steps:
Inspect The Rim
Before putting the tractor tire back on the rim, it’s crucial to thoroughly inspect the rim. Look for any signs of damage or wear, such as cracks, dents, or rust. These issues can affect the performance and safety of the tire, so it’s important to address them before proceeding.
If you notice any damage, it’s best to consult with a professional or replace the rim altogether. Remember, safety should always be your top priority, so don’t take any chances with a damaged rim.
Clean Up The Area
Once the rim is inspected and deemed suitable for use, it’s time to clean up the area. Remove any dirt, debris, or old sealant from the rim to ensure a clean surface for reinstallation. This step will help create a proper seal between the tire and rim, preventing air leakage and potential damage.
Using a clean cloth or a mild detergent, gently wipe down the rim to remove any dirt or grime. Pay close attention to the areas where the tire bead will make contact with the rim.
Note: Avoid using harsh chemicals or abrasive cleaning materials, as they can damage the rim’s surface.
Reinstall The Tire
With the rim cleaned and inspected, it’s time to place the tire back onto the rim. Ensure the tire is properly aligned with the rim and carefully guide the tire bead over the rim’s edge. Use a tire iron or a tool designed for this purpose to assist you in this step.
TIP: Applying a small amount of tire lubricant to the rim can make the installation process smoother.
Once the tire is in place, carefully inflate it to the manufacturer’s recommended pressure level. Double-check to ensure the tire is seated evenly on the rim and that no part of the tire is bulging or misaligned.
Test For Proper Fit And Function
Finally, it’s time to test the tire for a proper fit and function. Lower the tractor onto the ground and inspect the tire for any signs of uneven wear or improper alignment. Ensure the tire is rotating smoothly and without any wobbling or vibrations.
If you notice any issues during this test, cease use immediately and consult a professional for further inspection and repairs.
By following these final steps, you can complete the process of removing a tractor tire from the rim successfully. Remember to take your time and prioritize safety throughout the entire process.

Credit: www.youtube.com
Frequently Asked Questions On How To Remove Tractor Tire From Rim
How Do You Remove Tires From Rims?
To remove tires from rims, first, deflate the tire. Then, use a tire machine to loosen the tire from the rim. Pry off the tire using tire irons, starting at the valve stem. Finally, clean the rim before installing a new tire.
How Do You Remove A Front Tractor Tire?
To remove a front tractor tire, first, loosen the lug nuts. Then, jack up the tractor and support it with jack stands. Finally, remove the lug nuts and slide off the tire.
How Do You Remove A Rear Wheel From A Tractor?
To remove a rear wheel from a tractor, start by loosening the lug nuts. Jack up the tractor and remove the wheel.
How Do You Remove A Tire From A Riding Lawn Mower Rim?
To remove a tire from a riding lawn mower rim, start by deflating the tire. Then, use a tire iron to pry the tire off the rim carefully. Finally, lift the tire off the rim and replace it if necessary.
Conclusion
Removing a tractor tire from a rim can be a daunting task, but armed with the right tools and techniques, it can be accomplished successfully. It’s crucial to prioritize safety and follow the step-by-step process outlined in this guide. By doing so, you can ensure a smooth and efficient tire removal process, saving time and effort in the long run.
- How Much Does a Ford 9N Tractor Weigh - May 20, 2024
- How Many of My Exact Car were Made: Uncovering the Rarity - May 20, 2024
- How to Find Out What Someone Drives: Discover the Truth - May 20, 2024