To add Tesla to your app, you can integrate the Tesla API into your application’s code. This allows you to access and use Tesla-specific functionalities and features within your app.
By incorporating the Tesla API, users will be able to interact with their Tesla vehicles and control various aspects such as unlocking the doors, checking battery status, and initiating climate control. This integration provides a seamless experience for Tesla owners, enhancing the functionality and convenience of your app.
Additionally, the Tesla API documentation provides detailed instructions and examples to help you incorporate this feature into your app smoothly. Start by familiarizing yourself with the API documentation and follow the steps outlined to successfully add Tesla to your app.
Why Add Tesla To Your App?
Benefits of Tesla Integration for User Experience
When it comes to creating a successful and engaging app, incorporating popular brands and products can have a significant impact on user experience. One such brand that stands out is Tesla. By adding Tesla to your app, you can enhance the user experience and unlock a plethora of benefits that can set your app apart from the competition.
So, why should you consider adding Tesla to your app? Let’s delve into some of the key benefits:
Benefit 1: Increased Engagement
By integrating Tesla into your app, you can tap into the fascination surrounding electric vehicles and the innovative technology that powers them. Tesla has an enthusiastic and passionate user base, and by offering access to Tesla-related features or information within your app, you can attract and engage a larger audience.
Benefit 2: Enhanced Functionality
Adding Tesla to your app opens up a new realm of possibilities when it comes to functionality. You can explore features like real-time vehicle status updates, charging station locations, and even remote control options, providing users with a seamless experience that goes beyond the basic offerings of your app.
Benefit 3: Boost Your Brand Reputation
Aligning your app with a renowned and cutting-edge brand like Tesla can significantly enhance your brand’s reputation. Tesla is synonymous with innovation, sustainability, and luxury in the automotive industry. By associating your app with Tesla, you can leverage its positive brand image to improve your own brand’s credibility and attract more users.
Benefit 4: Competitive Advantage
In today’s highly competitive app market, it’s crucial to find ways to stand out from the crowd. Integrating Tesla into your app can give you that sought-after competitive edge. By offering unique Tesla-related features and functionality, you can differentiate your app and position it as a must-have for Tesla enthusiasts and electric vehicle enthusiasts alike.
So, as you can see, adding Tesla to your app can provide numerous benefits. From increased engagement and enhanced functionality to boosting your brand reputation and gaining a competitive advantage, incorporating Tesla is a smart move that can catapult your app to new heights.
Getting Started With Tesla Integration
Welcome to the world of Tesla integration! If you’re looking to add Tesla to your app and leverage its powerful capabilities, you’ve come to the right place. In this guide, we’ll walk you through the process of getting started with Tesla integration, helping you understand the Tesla API and how to make the most out of its features.
Understanding the Tesla API and its capabilities
The Tesla API opens up a world of possibilities for developers looking to integrate Tesla functionality into their apps. By leveraging the API, you can seamlessly interact with Tesla vehicles, retrieve data, and even control various vehicle features remotely. The capabilities offered by the Tesla API are truly impressive and can turn your app into a powerful tool for Tesla owners.
With the Tesla API, you’ll be able to:
- Retrieve vehicle data such as battery level, charging status, climate settings, and more.
- Control various vehicle features like door locks, climate settings, and even honking the horn.
- Monitor vehicle location and track trips.
- Initiate vehicle charging and pre-conditioning.
- And much more!
Sample code to get you started
Now that you have an understanding of the Tesla API and its capabilities, let’s dive into some sample code to get you started with Tesla integration in your app.
First, you’ll need to authenticate with the Tesla API by obtaining an access token. This token will be used to make API requests on behalf of the user. Here’s an example of how you can get an access token:
const clientId = 'your_client_id';
const clientSecret = 'your_client_secret';

const accessToken = fetch('https://auth.tesla.com/oauth2/v3/token', {
  method: 'POST',
  body: JSON.stringify({
    grant_type: 'client_credentials',
    client_id: clientId,
    client_secret: clientSecret,
    scope: 'vehicle:all'
  })
})
  .then(response => response.json())
  .then(data => data.access_token);
Once you have the access token, you can start making API requests to interact with Tesla vehicles. For example, to retrieve the battery level of a vehicle, you can use the following code:
const vehicleId = 'your_vehicle_id';
const batteryLevel = fetch(`https://api.tesla.com/vehicles/${vehicleId}/data_request/charge_state`, {
  headers: {
    'Authorization': `Bearer ${accessToken}`
  }
})
  .then(response => response.json())
  .then(data => data.battery_level);
This is just a glimpse of what you can achieve with Tesla integration. The possibilities are endless, and with a bit of creativity, you can create an incredible user experience for Tesla owners.
Now that you are equipped with the knowledge of the Tesla API and some sample code, it’s time to roll up your sleeves and start integrating Tesla into your app. Stay tuned for more exciting tips and tricks on Tesla integration in the upcoming sections!
Step 1: Register For Api Access
Before you can start adding Tesla to your app, you need to register for API access. The Tesla API allows developers to communicate with Tesla vehicles and access various vehicle data, such as charging status, location, and many other functionalities.
Creating a Tesla Developer Account
To get started, you’ll need to create a Tesla Developer account. Follow these steps to register:
- Go to the Tesla Developers website.
- Click on the “Get Started” or “Sign up” button.
- Fill in the required information, including your name, email address, and password. Make sure to choose a secure password to protect your account.
- Agree to the Terms of Service and Privacy Policy.
- Click on the “Create Account” button to complete the registration process.
Once you’ve successfully created your Tesla Developer account, you’ll be ready to move on to the next step.
Obtaining API Credentials
After creating your Tesla Developer account, you’ll need to obtain API credentials to authenticate your app and enable communication with the Tesla API. Here’s how you can get your API credentials:
- Log in to your Tesla Developer account.
- Go to the “My Apps” section.
- Click on the “New Application” button.
- Fill in the required information for your application, including the app name, description, and callback URL. The callback URL is the endpoint in your app where Tesla will send authentication tokens.
- Click on the “Create” button to generate your API credentials.
After creating your application, you’ll be provided with the necessary Client ID and Client Secret that you’ll use to authenticate your app and make API requests.

Now that you have registered for API access and obtained your API credentials, you’re ready to move on to the next steps of adding Tesla to your app. Stay tuned for the upcoming blog posts where we’ll cover the remaining steps in detail!
Step 2: Authenticating Your App
Once you have set up your app and registered it with the Tesla API, the next step is to authenticate your app. This ensures that only authorized users can access the Tesla API and perform actions on behalf of the user.
Implementing OAuth2 for Tesla API authentication
OAuth2 is a widely used authentication framework that allows secure authorization without exposing user credentials to third-party apps. To authenticate your app with the Tesla API, you will need to implement OAuth2.
Here’s how you can implement OAuth2 for Tesla API authentication:
- Register your app: Before implementing OAuth2, make sure your app is registered with the Tesla API. This step involves providing necessary details about your app and obtaining a client ID and client secret.
- Redirect user for authorization: When a user wants to access their Tesla account through your app, you need to redirect them to the Tesla API authorization page. This page will prompt the user to grant your app access to their Tesla account.
- Receive authorization code: Once the user grants access, the Tesla API will redirect the user back to your app with an authorization code. This code will be used to obtain an access token.
- Exchange authorization code for access token: Using the authorization code received in the previous step, your app needs to make a POST request to the Tesla API token endpoint to exchange the authorization code for an access token.
Obtaining access tokens for API requests
Access tokens are used to authenticate API requests made on behalf of the user. These tokens act as credentials to access the Tesla API resources.
Follow these steps to obtain access tokens for API requests:
- Make a POST request: To obtain an access token, your app needs to make a POST request to the Tesla API token endpoint. The request should include the client ID, client secret, authorization code (obtained previously), and the grant type.
- Receive access token: If the POST request is successful, the Tesla API will respond with an access token. This token is a long-lived credential that your app can use to make API requests on behalf of the user.
- Include access token in API requests: When making API requests, include the access token in the Authorization header using the Bearer token authentication scheme.
- Handle expired access tokens: Access tokens have a limited validity period. Your app should handle expired tokens by refreshing them using a refresh token, which can be obtained along with the access token.
By implementing OAuth2 and obtaining access tokens, you can ensure secure authentication for your app and allow users to interact with their Tesla accounts.
Be sure to check out Step 3 of this guide for instructions on how to make API requests to control Tesla vehicles and access other Tesla API resources.
Integrating Basic Tesla Features
Integrating core Tesla features into your app can take it to the next level, providing users with a seamless experience that combines the power of Tesla with the convenience of your app. Whether you’re developing a navigation app, a charging station locator, or even a remote control app, integrating basic Tesla features can enhance the functionality and user experience.
Enhancing app functionality with core Tesla features
By incorporating core Tesla features into your app, you can unlock a variety of functionalities that will make your app stand out from the competition. Here are some key ways you can enhance your app’s functionality with basic Tesla features:
| Core Tesla Features | Enhanced App Functionality |
|---|---|
| Vehicle Data API | Retrieve and display real-time vehicle data such as speed, battery level, and charging status. |
| Controls API | Enable users to remotely lock/unlock doors, honk the horn, flash lights, and even start or stop charging. |
| Climate API | Allow users to adjust climate controls, set temperature preferences, and pre-condition the vehicle. |
| Charging API | Provide users with information on nearby charging stations, current charging status, and estimated charge time. |
Implementing Tesla features into your app
To integrate these basic Tesla features into your app, you will need to make use of the Tesla API. The API allows your app to communicate with Tesla vehicles, retrieving and sending data in real-time. Here are the steps to implement Tesla features into your app:
- Create a Tesla Developer account on the Tesla Developer Portal.
- Generate an API token for your app.
- Use the API documentation to understand how to make requests to the Tesla API endpoints.
- Authenticate your app using the generated API token.
- Implement the desired Tesla features in your app’s codebase.
By following these steps and implementing the core Tesla features into your app, you can provide users with a rich and exciting experience, seamlessly integrating their Tesla vehicles into their daily lives.
Step 3: Retrieving Vehicle Information
Using the Tesla API to fetch vehicle data
Once you have successfully established a connection with the Tesla API, the next step is to retrieve the vehicle information. The Tesla API provides a wide range of data points that can be accessed and displayed in your app. This includes details such as the vehicle’s battery level, charging status, location, and much more.
To fetch the vehicle data, you will need to make use of specific API endpoints provided by Tesla. These endpoints allow you to send requests to the Tesla servers and receive the desired information in response. You can use programming languages like Python or JavaScript to make the necessary API calls.
Here is an example of how you can fetch the vehicle information using the Tesla API in Python:
import requests
import json

# Replace 'YOUR_ACCESS_TOKEN' with your actual access token
access_token = 'YOUR_ACCESS_TOKEN'

# Replace 'YOUR_VEHICLE_ID' with the ID of your Tesla vehicle
vehicle_id = 'YOUR_VEHICLE_ID'

# API endpoint to retrieve vehicle information
url = f'https://api.tesla.com/vehicles/{vehicle_id}/data'

# Set the necessary headers
headers = {
    'Authorization': f'Bearer {access_token}',
    'Content-Type': 'application/json'
}

# Send GET request to fetch vehicle data
response = requests.get(url, headers=headers)

# Check if the request was successful
if response.status_code == 200:
    vehicle_data = json.loads(response.text)
    # Process and display the vehicle data as needed
Displaying vehicle information in the app
Once you have retrieved the vehicle information from the Tesla API, the next step is to display it in your app. This can be done using various UI elements such as labels, tables, or cards depending on the design of your app. The goal is to present the data in a user-friendly and visually appealing manner.
You can utilize the vehicle information obtained from the API to provide real-time updates to your users. For example, you can display the battery level as a progress bar, show the charging status as a text indicator, or even plot the location of the vehicle on a map.
It’s important to ensure that the displayed vehicle information is regularly updated to reflect the latest data from the Tesla API. You can implement a background task or use websockets to actively listen for any changes in the vehicle state and update the UI accordingly.
Remember that good app performance and a clean user interface are key to creating a positive user experience. Make sure to optimize the code and design of your app to ensure smooth operation and easy navigation for your users.
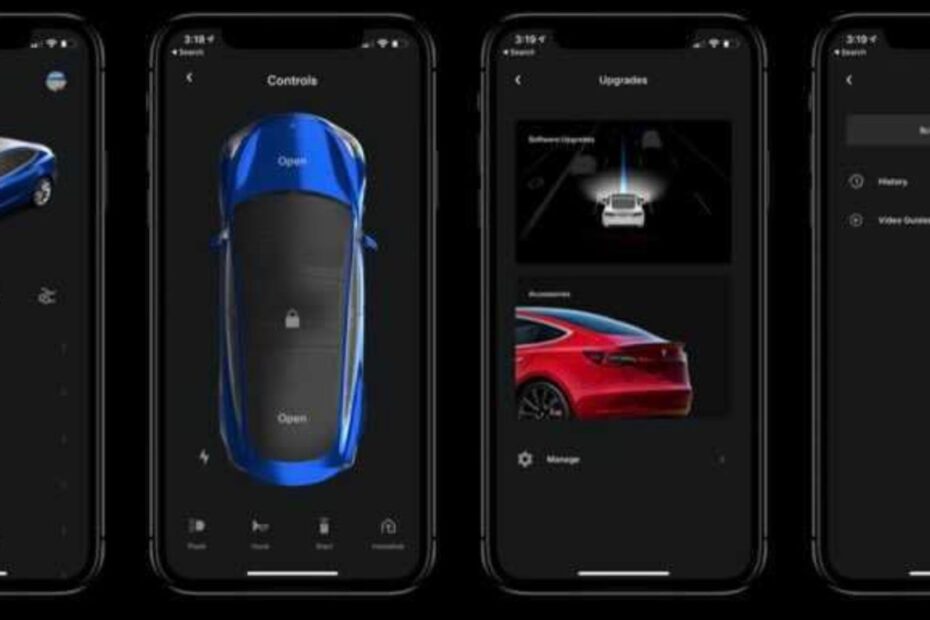
Step 4: Controlling Vehicle Functions
Sending commands to perform actions on the vehicle
Once you have successfully integrated Tesla into your app, you gain the ability to control various vehicle functions. This includes sending commands to perform actions such as locking/unlocking doors, honking the horn, and more. Let’s dive into how you can utilize these features and enhance the user experience.
Locking and unlocking doors
With the Tesla API, you can enable users to lock or unlock their vehicle’s doors remotely through your app. This feature provides an added layer of convenience and security for Tesla owners. Imagine your users being able to lock their doors as they walk away from their vehicle or unlock it when their hands are full. This seamless integration ensures a hassle-free experience.
Honking the horn
Need to grab someone’s attention or locate your vehicle in a crowded parking lot? You can enable users to remotely honk the horn of their Tesla right from within your app. This can come in handy in many situations, whether it’s locating the car in a large parking structure or simply attracting attention when required.
Flash the lights
In addition to honking the horn, you can enhance the visibility of the Tesla by enabling users to remotely flash the car’s lights through your app. This feature can be particularly useful in low light situations or when the vehicle needs to stand out in a crowded area.
Climate control
Another exciting feature you can offer through your app is climate control for the Tesla. With the API integration, users can pre-condition their vehicle’s temperature before even stepping inside. This is especially useful during extreme weather conditions, as it ensures a comfortable environment awaits the driver and passengers.
By giving users control over these vehicle functions, you elevate their overall experience and provide them with greater convenience and peace of mind. Integrating these features seamlessly within your app ensures that Tesla owners can interact with their vehicles effortlessly, regardless of their physical proximity.
Advanced Tesla Integration Techniques
Leveraging advanced features to further enhance user experience
When it comes to integrating Tesla into your app, leveraging advanced features can significantly enhance the user experience. By going beyond the basic functionalities and exploring advanced Tesla integration techniques, you can provide users with a seamless and interactive experience.
Customizing the Tesla User Interface
One way to enhance the user experience is by customizing the Tesla user interface within your app. This allows you to create a cohesive and branded experience for your users. By incorporating your app’s color scheme, logos, and design elements into the Tesla interface, you can create a visually appealing and personalized interface that aligns with your app’s overall look and feel.
Utilizing Tesla’s API for Real-Time Data
Another advanced technique is to leverage Tesla’s API to access real-time data. By integrating the API into your app, you can obtain vehicle data such as battery level, charging status, and location. This information can then be used to provide users with real-time updates and notifications. For example, you can send push notifications to users when their Tesla finishes charging or when the battery level reaches a certain percentage.
Implementing Voice Control and Commands
Adding voice control and commands to your app is another advanced technique that can enhance the user experience. By integrating voice recognition technology, users can interact with their Tesla through voice commands, making it more convenient and hands-free. Users can simply speak commands such as “open the sunroof” or “set the temperature to 72 degrees”, and your app will communicate with the Tesla to execute those actions.
Enabling Smart Home Integration
Integrating Tesla with smart home technology is a cutting-edge technique that can elevate the user experience. By connecting your app with compatible smart home devices and platforms, users can control their Tesla through voice assistants or automation routines. For instance, users can say “Alexa, start my Tesla” or set a routine that automatically opens the garage door and unlocks the Tesla when they arrive home.
Conclusion
To truly maximize the potential of Tesla integration into your app, it is crucial to explore advanced techniques that go beyond the basic functionalities. By leveraging customizations, real-time data, voice control, and smart home integration, you can create a highly interactive and personalized user experience. These advanced Tesla integration techniques not only enhance the usability of your app but also contribute to establishing your app as an innovative and forward-thinking platform.
Step 5: Remote Vehicle Monitoring
Implementing real-time monitoring of vehicle metrics is an essential aspect of adding Tesla to your app. This enables you to provide users with up-to-date information about their vehicle’s performance, allowing them to keep a close eye on their Tesla’s vital statistics. To achieve this, you need to focus on displaying vehicle stats, battery status, and location updates in an intuitive and user-friendly manner.
Implementing real-time monitoring of vehicle metrics
To implement real-time monitoring of vehicle metrics, you need to establish a connection between your app and the Tesla API. This connection allows you to fetch and display important data related to the vehicle’s performance. Here’s how you can accomplish this:
- First, ensure that you have the necessary credentials, such as the client ID and client secret, to access the Tesla API.
- Authenticate your app with the API using the obtained credentials.
- Once authenticated, you can make API requests to retrieve real-time data about the vehicle’s metrics, including speed, battery level, charging status, and more.
- Regularly update the data displayed on your app to provide users with the most recent information.
Remember to follow Tesla’s API documentation and guidelines to ensure you are using the API correctly and efficiently. This will help you avoid any potential issues and provide a seamless monitoring experience to your app users.
Displaying vehicle stats, battery status, and location updates
Now that you have a connection to the Tesla API and can fetch real-time data, you need to present this information to your app users in an easily understandable manner. Here are some suggestions on how to achieve this:
- Create an intuitive and visually appealing dashboard where users can view their vehicle’s key stats at a glance. Display metrics like speed, battery range, and energy consumption prominently.
- Include graphical representations, such as gauges or progress bars, to visualize battery status and energy efficiency.
- Provide a map view that shows the vehicle’s live location updates. This can be particularly useful for keeping track of a Tesla’s whereabouts or monitoring the progress of a charging session.
- Consider implementing push notifications to update users about important events or changes in their vehicle’s performance, such as low battery level or charging completion.
By effectively displaying vehicle stats, battery status, and location updates, you can provide users with a comprehensive and engaging remote monitoring experience for their Tesla.
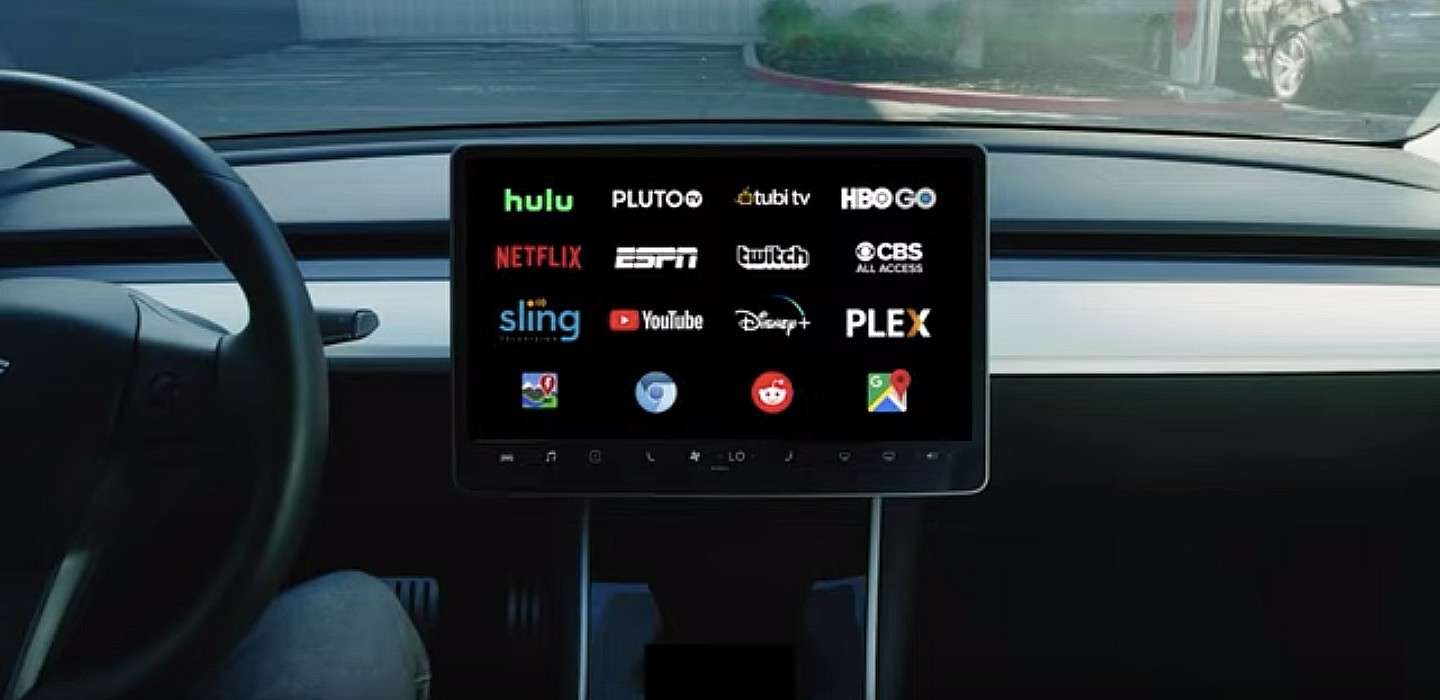
Credit: www.teslarati.com
Step 6: Integrating Climate Control And Charging
In this step, we will explore how to integrate climate control and charging features into your Tesla app. By allowing users to control temperature settings remotely and ensuring seamless charging options through your app, you can enhance the overall user experience. Let’s get started with how you can achieve this!
Allowing users to control temperature settings remotely
One of the key advantages of integrating climate control into your Tesla app is the ability for users to control temperature settings remotely. This feature allows Tesla owners to conveniently adjust the temperature of their vehicles from the comfort of their homes or offices, ensuring a pleasant and comfortable ride whenever they step inside their Tesla.
To incorporate this functionality into your app, you can utilize the Tesla API, which provides all the necessary tools and resources to interact with the vehicle’s climate control system. By tapping into this API, you can retrieve current climate settings, such as temperature, fan speed, and seat heating/cooling options, and allow users to adjust these settings with a simple swipe or tap on their mobile devices.
It’s important to note that while incorporating this feature, you should also prioritize user safety. Therefore, make sure to implement appropriate checks and validation to prevent extreme temperature changes that could negatively impact the vehicle’s battery efficiency or compromise driver comfort.
Incorporating charging features into the app
Another crucial aspect of adding Tesla to your app is incorporating charging features. Tesla owners heavily rely on their vehicles’ charging capabilities, and by providing seamless charging options through your app, you can simplify their charging experience.
To achieve this, you can leverage the Tesla API once again. By integrating with the charging state API, you can get real-time information about the vehicle’s charging status, including battery level, charging speed, and estimated charging time. This information can be displayed in an intuitive and user-friendly manner, ensuring Tesla owners stay informed throughout the charging process.
Additionally, you can enable users to start or stop charging remotely with a tap on their mobile devices. This means they no longer need to physically be near their vehicle to initiate or interrupt charging. Such flexibility not only saves time for Tesla owners but also allows them to proactively manage their charging schedule, benefiting their overall driving experience.
By incorporating these charging features into your Tesla app, you will be providing Tesla owners with a comprehensive solution that covers not just the control of their vehicles’ climate settings but also their charging needs. This integrated approach will undoubtedly enhance the usability and convenience of your app, making it a go-to platform for Tesla enthusiasts.
Optimizing Performance And User Experience
When it comes to adding Tesla to your app, optimizing performance and user experience are crucial for a seamless integration. By following best practices and implementing the right techniques, you can ensure that your users have a smooth and enjoyable experience while using your app. In this section, we will explore some of the key considerations and strategies to optimize the performance and user experience of your Tesla app integration.
Best practices for seamless app integration and performance
To achieve a seamless app integration with Tesla and deliver a high-performance experience, consider the following best practices:
- 1. Authenticate and authorize: Implement a secure authentication and authorization process to ensure that only authorized users can access Tesla’s functionalities within your app. This helps protect user data and prevent unauthorized actions.
- 2. Use Tesla APIs efficiently: Familiarize yourself with Tesla’s APIs and use them efficiently to minimize unnecessary requests and maximize performance. Avoid making redundant API calls and strive for a lean and optimized integration.
- 3. Implement caching mechanisms: Utilize caching mechanisms to store frequently requested data locally on the user’s device. This reduces the need for frequent API calls, speeds up data retrieval, and improves overall app performance.
- 4. Optimize network communications: Minimize network latency by optimizing network communications. Use techniques like compression, data chunking, and asynchronous operations to enhance the speed and reliability of data transfers between your app and Tesla’s servers.
- 5. Optimize image loading: Optimize image loading by compressing images, using lazy loading techniques, and employing responsive image strategies. This ensures that images are efficiently loaded without impacting the app’s performance.
- 6. Test and monitor performance: Regularly test and monitor the performance of your app integration with Tesla. Identify any bottlenecks, optimize code, and fine-tune your app to ensure optimal performance for your users.
Ensuring each H3 heading adheres to HTML syntax
HTML syntax provides a way to structure and organize content on the web. To adhere to HTML syntax for each H3 heading in this article, the <h3> tags are used to define the headings. This ensures proper formatting and hierarchy of the content, improving readability and accessibility for both humans and search engines.
Step 7: Caching Data And Managing Api Requests
Caching data and managing API requests are crucial steps in ensuring a smooth and efficient integration of Tesla into your app. By implementing caching techniques and handling API rate limits, you can optimize the retrieval and storage of data, minimize network requests, and enhance the overall performance of your app.
Implementing caching techniques to reduce API requests
One of the primary goals of caching is to reduce the number of API requests made by your app. By caching data locally, you can minimize the need to constantly fetch information from the Tesla API, resulting in faster load times and improved user experience.
Here are some caching techniques you can implement:
- Memory caching: Store frequently accessed data in the app’s memory for quick retrieval. This can be achieved using data structures like hash maps or dictionaries.
- File caching: Store data in temporary files on the device’s storage. This allows you to retrieve the cached data even if the app is closed and reopened.
- HTTP caching: Leverage the HTTP cache headers to control how long the responses from the Tesla API are cached. This ensures that subsequent requests for the same data can be served from the cache instead of making an API call.
Handling API rate limits and managing data updates
When integrating with the Tesla API, it’s important to handle rate limits and efficiently manage data updates. The API imposes certain limits on the number of requests you can make within a specific time frame to prevent abuse and maintain system stability.
| API Rate Limit | Time Window |
|---|---|
| 60 requests per hour | Authentication API |
| 1000 requests per hour | Vehicle API |
To adhere to these rate limits, consider implementing the following strategies:
- Rate limit monitoring: Keep track of the number of API requests made within a defined period. If the limit is reached or exceeded, delay or queue the requests to prevent triggering rate limit errors.
- Data updates: Regularly check for updates in the Tesla API data to ensure your app stays up to date. You can implement a background task that periodically fetches the latest data and updates the local cache.
By effectively managing rate limits and data updates, you can provide your app users with real-time information from Tesla while staying within the API’s boundaries.
Step 8: Designing A User-Friendly Interface
One of the crucial steps in adding Tesla to your app is designing a user-friendly interface that enhances the overall experience for your app users. A visually appealing and intuitive design can make a significant difference in how users interact with your app. In this step, we will explore the best practices for creating a stunning and user-friendly interface for your Tesla integration features.
Creating a visually appealing and intuitive app interface
When designing the interface for your app’s Tesla integration, it is essential to prioritize visual appeal and intuitiveness. Your app’s interface should be visually appealing to capture users’ attention and create a positive first impression. Utilize eye-catching colors, captivating graphics, and attention-grabbing typography to make your app visually appealing and inviting.
However, beauty alone is not enough. The interface should also be intuitive, allowing users to navigate through the app effortlessly. To achieve this, rely on user-centered design principles. Consider the cognitive load of your users and strive for simplicity in design. Remove any unnecessary elements and keep the navigation straightforward and self-explanatory.
| Best Practices for Designing a User-Friendly Interface |
|---|
| Use consistent branding elements to create a cohesive experience throughout the app. |
| Implement clear and intuitive navigation menus and icons. |
| Ensure that interactive elements are easy to identify and use. |
| Keep the layout clean and organized, avoiding clutter. |
| Design for different screen sizes and orientations to provide a seamless experience on all devices. |
| Consider accessibility features to accommodate users with varying abilities. |
By following these best practices, you can create a visually appealing and intuitive interface that encourages users to engage with your Tesla integration features seamlessly.
Optimizing UX for Tesla integration features
In addition to designing a visually appealing and intuitive interface, optimizing the overall user experience (UX) for your Tesla integration features is crucial. Your app should offer a smooth, efficient, and enjoyable experience for users when they interact with Tesla’s functionalities.
To optimize the UX, consider the following:
- Streamline the process of accessing Tesla integration features by placing them in logical and easily accessible locations within your app.
- Ensure that the integration features are responsive and perform quickly, minimizing any delays or lag that may frustrate users.
- Provide clear instructions and feedback to users when they interact with Tesla integration features, guiding them throughout the process.
- Regularly test and gather user feedback to identify and address any usability issues or pain points.
- Continuously iterate and improve the UX based on user insights, aiming for a seamless and delightful experience.
By optimizing the UX for your Tesla integration features, you can enhance user satisfaction, increase engagement, and ultimately drive the success of your app.
Testing And Debugging Your Tesla Integration
Ensuring Proper Functionality and Resolving Issues
Once you have successfully integrated Tesla into your app and completed the necessary setup steps, it is crucial to test and debug your integration to ensure its proper functionality. This will help you identify and resolve any issues that may arise, ensuring a smooth user experience.
Here are some steps you can follow to test and debug your Tesla integration:
- Create a Test Environment: Set up a separate environment specifically for testing your Tesla integration. This will allow you to isolate and identify any issues without affecting the live version of your app.
- Test Authentication: Verify that the authentication process is working correctly by logging in and authenticating with your Tesla account. This will ensure that the app can communicate securely with the Tesla API.
- Test API Endpoints: Test each API endpoint that you have integrated into your app. Make sure that the requests are being sent correctly, and the responses are returned as expected.
- Verify Data Accuracy: Check that the data retrieved from the Tesla API is accurate and up-to-date. This includes information such as vehicle status, battery level, and location.
- Test User Actions: Simulate user actions within your app that interact with the Tesla integration, such as locking/unlocking doors, starting/stopping charging, or controlling climate settings. Ensure that these actions are being sent to the Tesla API correctly and that the desired changes are reflected in the vehicle.
- Monitor Performance: Keep an eye on the performance of your app during testing. Look out for any slow response times or errors that may occur.
- Implement Error Handling: Prepare your app to handle any errors or exceptions that may arise from the Tesla integration. This will help prevent crashes or unexpected behavior.
Resolving Issues
If you encounter any issues during the testing and debugging process, it is essential to resolve them to ensure a seamless user experience. Here are some troubleshooting tips to help you resolve common integration issues:
- Check Documentation: Refer to the Tesla API documentation and developer resources to find solutions to common integration issues. The documentation usually provides valuable insights into error codes, troubleshooting steps, and best practices.
- Review Code: Analyze your app’s code to identify any potential bugs or discrepancies that may be causing the issue. Look for any inconsistencies or incorrect implementation of the Tesla API endpoints.
- Review API Changes: Stay updated with any changes or updates to the Tesla API. Sometimes, API updates may require adjustments to your integration code to maintain compatibility.
- Debugging Tools: Utilize debugging tools available in your programming environment or integrated development environment (IDE) to help identify the root cause of the issue. This may include examining logs, inspecting network requests, or using breakpoint debugging.
- Seek Developer Forums: Engage with the developer community for support and guidance. Online forums, discussion boards, and developer communities can provide valuable insights, solutions, or workarounds for specific integration issues.
- Collaborate with Tesla API Support: If you exhaust all available resources and are still unable to resolve the issue, reach out to Tesla API support for direct assistance. They have dedicated support channels to help developers with integration-related problems.
By meticulously testing and debugging your Tesla integration and promptly resolving any issues that arise, you can ensure that your app offers a seamless and reliable experience for users.
Step 9: Testing Api Requests And Responses
One of the final steps in adding Tesla to your app is to test the API requests and responses. This is an essential part of ensuring that your app can successfully communicate with Tesla’s servers and retrieve the necessary data or execute commands. In this step, we will cover the tools and frameworks you can use for API testing, as well as how to verify correct data retrieval and command execution.
Using tools and frameworks for API testing
When it comes to testing API requests and responses, there are several tools and frameworks available that can simplify the process. These tools allow you to send requests to the Tesla API and inspect the responses to ensure they meet your expectations. Here are some popular options:
- Postman: Postman is a widely-used API testing tool that provides a user-friendly interface for sending requests, inspecting responses, and organizing test cases. With its rich set of features, you can easily test different endpoints, headers, and payloads.
- curl: If you prefer command-line tools, curl is an excellent choice. It allows you to send HTTP requests directly from the terminal, making it convenient for quick and simple tests. You can use the -X flag to specify the HTTP method and include headers and parameters as needed.
- Insomnia: Insomnia is another powerful API testing tool that offers a clean and intuitive interface. It supports various authentication methods, scripting, and the ability to organize and share your tests. With its collaboration features, you can easily work with your team on API testing.
Verifying correct data retrieval and command execution
Once you have a testing tool in place, it’s essential to verify that the correct data is retrieved from the Tesla API and that commands are executed successfully. This ensures that your app functions as expected and provides an optimal user experience. Here’s how you can verify these aspects:
- Data retrieval: When testing data retrieval, you should verify that the API endpoints return the expected data. For example, if you are retrieving vehicle information, ensure that the response includes the necessary details such as the vehicle’s model, battery level, and location. You can also compare the returned data against the expected values or predefined test data.
- Command execution: To test command execution, you will send requests to the API endpoints responsible for executing actions such as unlocking the doors or starting the vehicle’s climate control. After sending the request, check the response to ensure it indicates a successful execution. Additionally, you can verify that the desired action is reflected in your app or any connected devices.
By thoroughly testing the API requests and responses, you can confidently integrate Tesla’s functionality into your app. With the right tools and verification methods, you can ensure a seamless user experience and reliable communication with Tesla’s servers.
Step 10: Troubleshooting Common Integration Errors
After successfully integrating Tesla into your app, you may encounter some common errors that can hamper the smooth functioning of the integration. In this step, we will delve into how to identify and resolve these errors to ensure your Tesla API integration is seamless and error-free.
Identifying and resolving common Tesla API integration pitfalls
While integrating Tesla into your app, you might come across certain hurdles that can impede the process. Let’s take a look at some of the common pitfalls and how to tackle them:
| Error | Solution |
|---|---|
| Invalid API key | Double-check that the API key you are using is valid and correctly entered. Ensure that you have proper authorization to access Tesla’s API. |
| Incorrect endpoint URL | Verify that the API calls are made to the correct endpoint URL. Make sure the endpoint URL matches the one specified in Tesla’s API documentation. |
| Missing required parameters | Check if all the required parameters are included in the API requests. Missing parameters can result in errors or unexpected behavior. |
| Inconsistent data formats | Ensure that the data formats used in API requests and responses correspond to the format specified in Tesla’s API documentation. Inconsistent data formats can cause errors. |
Handling authentication errors, rate limiting, and server issues
Authentication errors, rate limiting, and server issues are common challenges that you may face while integrating Tesla into your app. Here’s how you can effectively handle these issues:
- Authentication errors: If you encounter authentication errors, double-check the credentials used for authentication. Verify that the API key and secret key are correct. Also, ensure that you have followed the authentication process correctly as outlined in Tesla’s API documentation.
- Rate limiting: Tesla’s API imposes rate limits to prevent misuse and maintain server performance. If you encounter rate limiting errors, review the rate limiting policies mentioned in Tesla’s API documentation. Consider optimizing your app’s API calls to adhere to the rate limits.
- Server issues: If you come across server issues, such as timeouts or 500 Internal Server Errors, check the status of Tesla’s API server. Temporary server issues are common, so try again after some time. If the problem persists, reach out to Tesla’s support team for assistance.
By effectively troubleshooting these common integration errors, you can ensure that your app’s integration with Tesla’s API is resilient and provides a seamless user experience.
Frequently Asked Questions Of How To Add Tesla To App
Why Won T My Tesla App Connect To My Car?
If your Tesla app is not connecting to your car, try these steps: Ensure your car is within range and has an active internet connection. Check if your app is up to date and try restarting both your car and phone.
If the issue persists, contact Tesla support for further assistance.
How Do I Use The Tesla App On My Phone?
To use the Tesla app on your phone, open the app and log in with your Tesla account credentials. From there, you can control various features of your Tesla, such as locking and unlocking the doors, starting the car remotely, adjusting the climate settings, monitoring charging status, and locating your vehicle.
How Do I Transfer My Tesla Account?
To transfer your Tesla account, contact Tesla customer support. Provide them with the necessary information, such as your account details and the recipient’s contact information. The support team will guide you through the process.
How Do I Access My Tesla Account?
To access your Tesla account, go to the official Tesla website and click on the “Sign In” button. Enter your email address and password and click “Login. ” Once logged in, you can access and manage your Tesla account details, including vehicle information, settings, and payment options.
How Can I Add Tesla To My App?
To add Tesla to your app, you can integrate the Tesla API and use the available documentation and SDKs provided by Tesla.
What Are The Benefits Of Adding Tesla To My App?
Adding Tesla to your app allows users to control their Tesla vehicles remotely, monitor their vehicles’ status, and access various features such as climate control, charging status, and location tracking.
Is It Necessary To Have A Tesla Vehicle To Add It To My App?
Yes, you need to have a Tesla vehicle to add Tesla functionality to your app as the API integration requires a valid Tesla vehicle ID and authorization.
Conclusion
To successfully add Tesla to your app, follow these simple steps and enhance your users’ experience. Begin by researching Tesla’s API documentation and understanding the available features and functionalities. Next, integrate the Tesla API into your app using the provided SDKs or libraries.
Test your implementation thoroughly to ensure seamless compatibility. Lastly, regularly update your app to incorporate any new enhancements or modifications from Tesla. By following these guidelines, you can provide your users with a valuable and interactive Tesla experience within your app.