To bleed hydraulic brakes, follow these steps: Firstly, prepare the necessary tools and materials. Secondly, locate the bleed valves on the brake calipers or brake cylinders.
Next, attach a clear plastic tube to the bleed valve and place the other end in a container with brake fluid. Then, have a partner pump the brake lever or pedal while you open and close the bleed valve. Lastly, repeat the process until all the air bubbles are eliminated, and only clean fluid is coming out.
Bleeding hydraulic brakes ensures optimal brake performance and safety on your vehicle. This essential maintenance task should be performed regularly to ensure your brakes function effectively. By following these steps, you can maintain the longevity and functionality of your hydraulic brake system.
Credit: epicbleedsolutions.com
Safety Precautions
When working with hydraulic brakes, it’s essential to follow safety precautions to prevent potential accidents and injuries.
Wear Protective Gear
Always wear protective gear such as gloves and safety goggles to shield yourself from hazardous brake fluid and debris.
Work In A Well-ventilated Area
Ensure you work in a well-ventilated area to prevent inhaling fumes from the brake fluid, which can be harmful to your health.
Use Proper Tools

Using the appropriate tools for bleeding hydraulic brakes is crucial for the safety and efficiency of the task.
Gathering The Necessary Supplies
To bleed hydraulic brakes, gathering the necessary supplies is crucial. Make sure to have a brake bleeding kit, a wrench, and the recommended brake fluid on hand to ensure a smooth and effective brake flushing process.
Brake Fluid
Gather high-quality brake fluid that is compatible with your vehicle’s specifications.
Bleeder Bottle
Ensure you have a properly sealed bleeder bottle to collect the old brake fluid during the bleeding process.
Wrench
Have the correct size of wrench ready to fit the bleeder valve on your brake calipers.
Clear Tubing
Get transparent tubing that fits snugly over the bleeder valve to direct the brake fluid flow.
Shop Towels
Keep absorbent shop towels handy to wipe away any spills or drips that may occur during the process.
Gathering the Necessary Supplies is essential before you begin to bleed hydraulic brakes.
Preparing The Brake System
Lift The Vehicle
First, lift the vehicle securely and place it on jack stands to provide adequate clearance.
Remove The Wheels
Next, use a lug wrench to remove the wheels from the vehicle to access the brake components.
Locate The Brake Bleeder Valve
Find the brake bleeder valve on the brake caliper, typically located at the top or back portion.

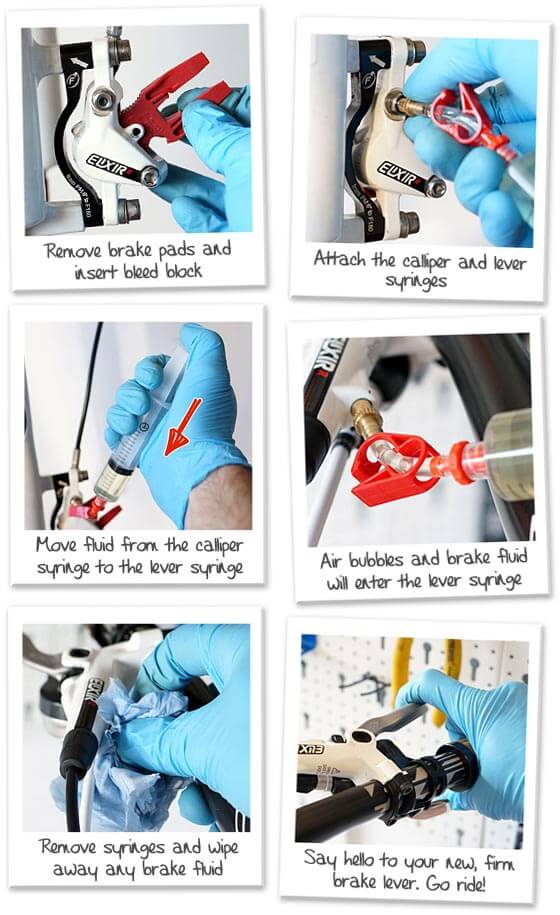
Credit: www.youtube.com
Bleeding The Brakes
The process of bleeding the brakes is essential for maintaining the proper functioning of your hydraulic brake system. Bleeding the brakes removes air bubbles that can compromise the effectiveness of the brakes, ensuring a firm and responsive pedal feel.
Attach Clear Tubing
Before starting the bleeding process, attach clear tubing over the bleeder valve on the caliper. Ensure that the tubing is long enough to reach a clear container or bottle to collect the old brake fluid.
Open The Bleeder Valve
With the tubing in place, use a wrench to carefully loosen the bleeder valve. Always remember to protect your eyes and skin by wearing safety goggles and gloves. As you loosen the valve, air and old brake fluid will begin to flow through the tubing.
Have Someone Depress The Brake Pedal
Ask someone to sit in the driver’s seat and depress the brake pedal slowly and steadily. This action helps push the brake fluid and air bubbles out of the caliper and into the clear tubing. Make sure the person holding the pedal keeps it depressed until you signal them to release it.
Close The Bleeder Valve

Once you see the old brake fluid flowing consistently and no air bubbles are visible, close the bleeder valve by turning it clockwise. Ensure the valve is securely tightened to avoid any leaks or air intake into the brake system.
Repeat The Process
After closing the valve, repeat the process, ensuring that you check the brake fluid level and top it off as needed throughout the bleeding process. Continue this process until you see clear, bubble-free brake fluid flowing from the caliper.
After Bleeding The Brakes
Once you have successfully bled the hydraulic brakes of your vehicle, there are a few essential steps you need to follow to complete the process. These steps include checking the brake fluid level, replacing the wheels, and testing the brakes to ensure optimum performance. Paying attention to these crucial steps can help ensure that your brake system is functioning properly and that you are ready to hit the road safely.
Check Brake Fluid Level
After bleeding the brakes, it is important to check the brake fluid level to ensure that it is at the appropriate level. Low brake fluid can lead to a spongy brake pedal and reduced braking performance. To check the brake fluid level, follow these simple steps:
- Park your vehicle on a level surface and engage the parking brake.
- Pull the hood release lever inside the vehicle to open the hood.
- Locate the brake fluid reservoir, which is usually positioned near the firewall on the driver’s side.
- Remove the cap from the reservoir and inspect the fluid level, ensuring it falls between the minimum and maximum marks indicated on the reservoir.
- If the fluid level is low, carefully add brake fluid until it reaches the appropriate level. Make sure to use the recommended type of brake fluid for your vehicle.
- Securely replace the cap on the reservoir.
Replace The Wheels
After checking the brake fluid level, it is time to replace the wheels that you may have removed during the bleeding process. Properly installing the wheels is vital for the overall safety and performance of your vehicle’s brake system. Follow these steps when replacing the wheels:
- Ensure that you have the correct wheel for each specific corner of the vehicle. The wheels should match the lug pattern and be the proper size for your tires.
- Clean the hub surface to remove any dirt or debris, allowing for a secure and smooth fit.
- Align the holes on the wheel with the lug studs and carefully slide the wheel onto the hub.
- Tighten the lug nuts in a star pattern to ensure even and proper torque. This will help prevent the wheel from becoming loose while driving.
- Repeat the process for the remaining wheels.
- Double-check that all lug nuts are tightened to the manufacturer’s specifications to prevent any potential issues.
Test The Brakes
The final step after bleeding hydraulic brakes is to thoroughly test the brake system to ensure that it is functioning correctly. Testing the brakes is necessary to guarantee your safety on the road. Follow these steps when testing the brakes:
- Start your vehicle’s engine and allow it to warm up.
- Slowly and smoothly apply pressure to the brake pedal, checking for any abnormal sensations or noises.
- Ensure that the brake pedal feels firm and does not sink to the floor when applying pressure.
- Test the brakes at various speeds, gradually increasing the intensity of the braking to assess their responsiveness.
- Listen carefully for any squeaking or grinding noises that could indicate a problem with the brake pads or rotors.
- If you notice any issues during the brake test, such as a soft pedal or unusual noises, consult a professional mechanic to diagnose and address the problem promptly.
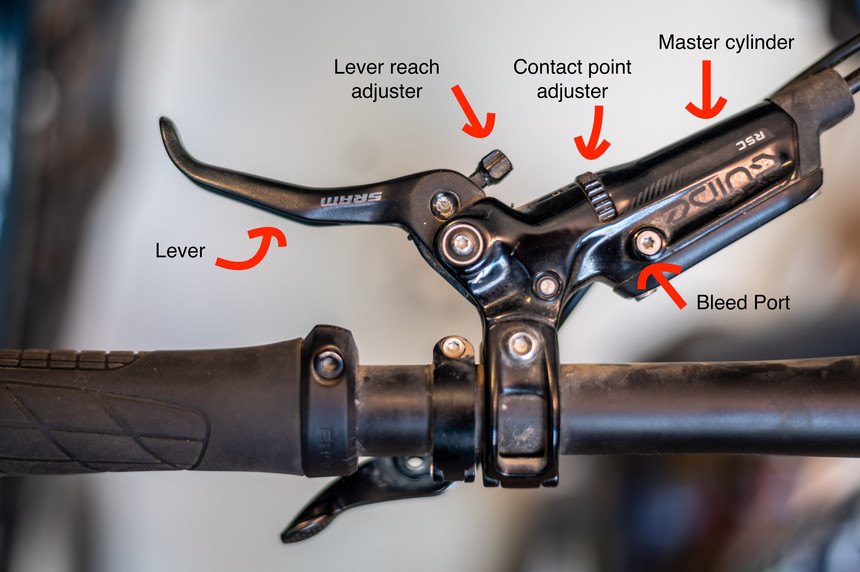
Credit: www.tetongravity.com
Frequently Asked Questions On How To Bleed Hydraulic Brakes
How Do You Bleed Air Out Of A Hydraulic Braking System?
To bleed air out of a hydraulic braking system, start with the wheel farthest from the master cylinder. Attach a clear tube to the bleeder valve, then open the valve and have someone depress the brake pedal. Repeat until no air bubbles are visible.
Close the valve and move to the next wheel.
How Do You Bleed Hydraulic Brakes By Yourself?
To bleed hydraulic brakes by yourself, start by attaching a clear plastic tube to the bleeder valve. Open the valve, pump the brakes, and add more fluid until no air bubbles are present. Close the valve, top off the reservoir, and test the brakes to ensure proper function.
What Are The Two Methods Of Bleeding Hydraulic Brakes?
The two methods of bleeding hydraulic brakes are the traditional method and the pressure method.
How Do I Know If My Hydraulic Brakes Need Bleeding?
You may need to bleed your hydraulic brakes if they feel spongy or lose effectiveness. Watch for air bubbles in the brake fluid and listen for a soft brake lever or pedal. Periodic bleeding can ensure optimal brake performance.
How Often Should You Bleed Hydraulic Brakes?
It is recommended to bleed hydraulic brakes every 1-2 years or when you notice a decrease in braking performance.
Can You Bleed Hydraulic Brakes Yourself?
Yes, you can bleed hydraulic brakes yourself with the right tools and knowledge. It’s a straightforward process, but be sure to follow proper safety precautions.
What Happens If You Don’t Bleed Hydraulic Brakes?
If you don’t bleed hydraulic brakes, air bubbles can form in the brake lines, leading to decreased braking performance and potential safety hazards.
Conclusion
In sum, bleeding your hydraulic brakes is a crucial maintenance task that ensures optimal performance and safety. With the right tools and technique, you can successfully purge air from the system and maintain the proper pressure. Regularly performing this procedure will prolong the life of your brakes and provide a smooth, responsive ride.