To get a frozen gas cap off, use a hairdryer to thaw the ice and then twist it off. Now let’s discuss how to effectively remove a frozen gas cap and get back on the road quickly.
No one wants to have their plans delayed by a simple inconvenience like a stuck gas cap. However, during the cold winter months, it is not uncommon for gas caps to freeze, making it difficult to access your fuel tank.
We will explore a simple and effective method to safely remove a frozen gas cap, allowing you to continue your journey without any further interruptions. By following these steps, you can easily thaw and twist off a frozen gas cap, ensuring a hassle-free experience.
:max_bytes(150000):strip_icc()/guide-to-homemade-pizza-FT-MAG0322-5269d2b72b9b4d69aa3634c5d182b11b.jpg)
Credit: www.foodandwine.com
Understanding The Problem: Why Gas Caps Freeze
Dealing with a frozen gas cap can be an annoying and frustrating issue, especially during winter months when the temperatures drop to extreme lows. Understanding why gas caps freeze is the first step in finding a solution to this problem. Several factors contribute to the freezing of gas caps, and being aware of these factors can help you prevent or resolve this issue effectively.
<h3>Factors contributing to gas cap freezing</h3>
Identifying the factors that contribute to gas cap freezing can help you take appropriate measures to prevent it from happening. Here are some common factors to consider:
- Moisture: Moisture and condensation can accumulate around the gas cap area, leading to freezing when temperatures plummet. Snow, rain, and humidity all play a role in causing freezing.
- Low Temperatures: Extremely cold temperatures, especially below the freezing point, can make it more likely for the gas cap to freeze. When the cap comes into contact with the cold, it can ice over.
- Water in the Gas Tank: If there is water present in your vehicle’s gas tank, it can freeze and cause the gas cap to freeze as well. Water can enter the tank due to issues like condensation or a fueling mishap.
- Debris and Dirt: Debris, dirt, and road salt that accumulate around the gas cap area can create a barrier and increase the chances of freezing. These substances can also clog the cap, making it difficult to open.
<h3>Effects of a frozen gas cap on your vehicle</h3>
A frozen gas cap not only poses inconveniences but can also have negative effects on your vehicle. It’s important to be aware of the potential consequences to avoid further damage. Some effects of a frozen gas cap include:
- Fuel Blockage: When the gas cap freezes, it can block the flow of fuel from the tank to the engine. This blockage can cause engine performance issues and may even prevent the vehicle from starting.
- Pressure Build-Up: In some cases, a frozen gas cap can lead to pressure build-up within the gas tank. This pressure build-up can cause fuel leaks or damage to other components of the fuel system.
- Damaged Cap: Attempting to forcefully remove a frozen gas cap can lead to physical damage. This can result in a broken or cracked cap, requiring replacement and additional expenses.
Now that you understand the factors contributing to gas cap freezing and the potential effects it can have on your vehicle, you can take necessary precautions to prevent this problem. In the next section, we will discuss some effective methods to get a frozen gas cap off, ensuring a smooth and hassle-free experience.
Preparing For Thawing: Necessary Tools And Equipment
When your gas cap becomes frozen, it can be an annoying roadblock to starting your car. The freezing temperature can cause the gas cap to become stuck, making it difficult to unscrew and refill your tank. However, with the right tools and equipment, you can quickly and safely thaw your frozen gas cap. In this section, we will discuss the necessary materials you should gather before you begin the thawing process.
Gathering the required materials
Before you begin thawing your frozen gas cap, make sure you have the following materials ready:
- De-icing fluid or lock thawing spray
- Warm water
- Lint-free cloth or paper towels
- Wire brush or toothbrush
- Rubber gloves
Having these materials on hand will ensure that you have everything you need to safely and effectively remove the frozen gas cap.
Importance of safety precautions
It’s crucial to prioritize safety when dealing with a frozen gas cap. Frozen surfaces can be slippery and pose a risk of injury. Additionally, the de-icing fluid or lock thawing spray can be harmful if ingested or comes into contact with your skin or eyes. Therefore, it’s essential to follow these safety precautions:
- Wear rubber gloves to protect your hands from the de-icing fluid and freezing temperatures.
- Work in a well-ventilated area to avoid inhaling any fumes from the de-icing fluid.
- Avoid touching your face or eyes while working with the materials to prevent any accidental contact.
- Store the de-icing fluid in a safe place, out of reach of children or pets.
- Dispose of any leftover de-icing fluid responsibly, following the instructions on the packaging.
By taking these safety precautions, you can ensure a safe and smooth thawing process for your frozen gas cap.
Non-Intrusive Methods To Thaw A Frozen Gas Cap
If you’ve ever encountered a frozen gas cap, you know the frustration it can bring. Fortunately, there are non-intrusive methods you can try to thaw a frozen gas cap. These methods involve using warm water or applying heat using a hairdryer. Let’s explore these techniques and get you back on the road quickly.
Using warm water to thaw the ice
One of the easiest and most effective ways to thaw a frozen gas cap is by using warm water. Here’s how you can do it:
- Start by boiling some water in a kettle or on the stove. Make sure you have enough water to completely cover the gas cap.
- Once the water is boiling, carefully pour it over the frozen gas cap. Be cautious not to spill the hot water on yourself or the car’s paintwork.
- Allow the warm water to sit on the gas cap for a few minutes. The heat from the water will gradually melt the ice and thaw the cap.
- After a few minutes, try turning the gas cap to see if it has loosened. If it resists, repeat the process until the ice is completely melted.
- When the gas cap is no longer frozen, pat it dry with a clean cloth or paper towel.
Applying heat using a hairdryer
If you don’t have access to warm water, another effective method is to use a hairdryer to apply heat to the frozen gas cap. Follow these steps:
- Plug in the hairdryer and set it to the highest heat setting.
- Hold the hairdryer a few inches away from the gas cap and aim the hot air directly at the cap.
- Move the hairdryer around, ensuring that all areas of the gas cap are exposed to the hot air.
- Continue applying heat for a few minutes. The warmth will gradually melt the ice and allow you to turn the gas cap.
- Once the gas cap is no longer frozen, turn off the hairdryer and let the cap cool down for a few moments before attempting to remove it.
Using warm water or a hairdryer are non-intrusive methods that can help you thaw a frozen gas cap. By following these steps, you can quickly get your gas cap unstuck and get back on the road.
Removing A Stubborn Frozen Gas Cap
Frozen gas caps can be quite frustrating, especially during the winter months. The combination of low temperatures and moisture can cause your gas cap to freeze shut, making it difficult to refill your vehicle’s tank. But fear not! In this guide, we will provide you with some effective methods for removing a stubborn frozen gas cap. Whether you choose to use a de-icer spray, apply lubricants, or utilize a heat gun or torch, these techniques will help you regain access to your gas tank quickly and easily.
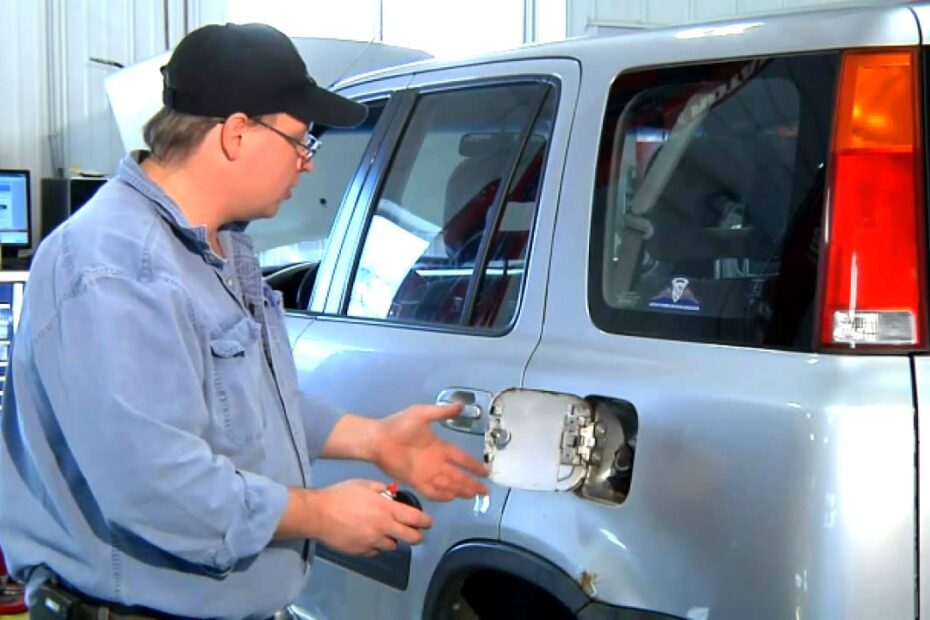
Using a de-icer spray
If you’re dealing with a frozen gas cap, one of the easiest solutions is to use a de-icer spray. This specially formulated spray is designed to melt ice and frost, making it an ideal choice for freeing up a stubborn gas cap. Here’s how you can go about using a de-icer spray:
- Begin by purchasing a de-icer spray from your local automotive store.
- Make sure you have a clear path to your gas cap, removing any snow or ice that may be covering it.
- Hold the de-icer spray bottle about 6-8 inches away from the gas cap.
- Apply the spray generously, making sure to cover the entire gas cap.
- Wait a few minutes for the de-icer to work its magic.
- Once the ice has melted, try turning the gas cap counterclockwise to open it.
Applying lubricants for easy removal
If a de-icer spray isn’t readily available, you can also try using lubricants to loosen a frozen gas cap. Lubricants such as WD-40 or silicone spray can help reduce friction and make it easier to open the cap. Follow these simple steps to apply lubricants:
- Purchase a can of WD-40 or silicone spray from your nearest hardware store.
- Clean any snow or ice from the gas cap area.
- Spray the lubricant around the base of the gas cap, ensuring that it penetrates the grooves.
- Wait a few minutes to allow the lubricant to work its way into the frozen parts.
- Attempt to turn the gas cap counterclockwise using moderate pressure.
Utilizing a heat gun or torch
If all else fails, using a heat gun or torch can provide the necessary heat to melt the ice and free your gas cap. However, it’s important to exercise caution and follow safety guidelines when using heat sources. Here’s how you can safely utilize a heat gun or torch:
- Ensure you have a heat gun or torch specifically designed for automotive use.
- Carefully remove any snow or ice from around the gas cap.
- Hold the heat gun or torch a safe distance away from the gas cap.
- Move the heat source back and forth across the frozen area, applying heat evenly.
- After a few minutes, try turning the gas cap counterclockwise to open it.
Remember, it’s essential to prioritize safety when using heat sources. Avoid pointing the heat gun or torch directly at any fuel lines or nearby flammable materials, and always follow the manufacturer’s instructions for proper use.
By following these methods, you’ll be able to remove even the most stubborn frozen gas cap with ease. Whether you choose to use a de-icer spray, lubricants, or a heat gun or torch, these techniques will help you get back on the road and refuel your vehicle successfully.
Preventative Measures To Avoid A Frozen Gas Cap

Facing a frozen gas cap can be a major headache, especially during the colder months. It not only prevents you from refueling your vehicle but can also lead to potential damage. However, by implementing a few preventive measures, you can save yourself from the frustration and inconvenience of dealing with a frozen gas cap.
Insights on how to prevent gas cap freezing
1. Securely close the gas cap: Ensuring that your gas cap is properly closed and tightened after every refueling can help prevent moisture from entering the gas tank. This moisture can freeze along with the gas cap, leading to the frozen gas cap situation.
2. Use a fuel additive: Adding a fuel additive specifically designed to lower the freezing point of gasoline can be an effective preventive measure. These additives work by altering the chemistry of the fuel, making it less susceptible to freezing in low temperatures. Follow the manufacturer’s instructions when adding the additive to maximize its benefits.
3. Apply a lubricant: Applying a thin layer of lubricant, such as silicone spray or petroleum jelly, to the rubber gasket and metal components of the gas cap can help prevent freezing. The lubricant acts as a barrier, preventing moisture from reaching the cap and freezing it shut.
Importance of regular maintenance
Regular maintenance plays a crucial role in preventing a frozen gas cap. By following these simple steps, you can minimize the chances of encountering a frozen gas cap:
- Inspect the gas cap: Check the condition of the gas cap regularly for any signs of wear or damage. If the cap is cracked, loose, or worn out, it is advisable to replace it immediately. This ensures a proper seal and reduces the risk of moisture entering the gas tank.
- Clean the gas cap: Dirt, debris, and salt residue can accumulate on the gas cap, making it more susceptible to freezing. Regularly clean the gas cap using a mild detergent and warm water, taking care to remove any buildup around the seal area. Rinse and dry thoroughly before reattaching the cap.
- Check for leaks: A gas cap that is not tightly sealed can lead to fuel evaporation, reduced fuel efficiency, and potential damage to the vehicle’s emission control system. Ensure the gas cap is properly tightened and seals tightly to prevent leaks.
- Store your vehicle indoors: Parking your vehicle in a garage or covered area can help protect it from extreme cold temperatures, reducing the chances of a frozen gas cap. If parking indoors is not an option, using a car cover can provide an extra layer of insulation.
By incorporating these preventive measures into your routine vehicle maintenance, you can increase the lifespan of your gas cap and avoid the inconvenience of a frozen gas cap altogether.
Professional Assistance For Stubborn Frozen Gas Caps
If you’ve ever dealt with a frozen gas cap, you know how frustrating and time-consuming it can be. Trying to force it open can potentially damage the cap or the surrounding area, leading to costly repairs. In such cases, seeking the help of a professional can save you both time and money. Professional assistance is especially crucial when dealing with stubborn frozen gas caps that refuse to budge. In this section, we will discuss when to seek the help of a professional and how to choose the right service provider.
When to seek the help of a professional
When faced with a frozen gas cap that won’t loosen no matter what you try, it’s time to consider seeking professional assistance. While you can attempt some DIY methods like using a hairdryer or de-icer spray, these may not always be effective for stubborn frozen gas caps. Additionally, excessively heating the gas cap can cause damage or pose a safety risk. Therefore, professional help becomes necessary. Here are a few signs that indicate it’s time to call in the experts:
- The gas cap has been frozen for an extended period and hasn’t budged despite multiple attempts
- You’ve tried various DIY methods, but none have worked
- You’re concerned about causing damage to the gas cap or the surrounding area
- The weather conditions are extreme, making it even more challenging to thaw the frozen cap
Choosing the right service provider
When enlisting professional assistance for a stubborn frozen gas cap, it’s important to choose the right service provider. Here are some factors to consider:
- Experience and expertise: Look for a service provider with experience in dealing with frozen gas caps. They should have the necessary knowledge and training to handle the situation effectively.
- Reputation and reviews: Research and read reviews or testimonials from previous customers. A reputable service provider will have positive feedback and good ratings.
- Availability and response time: Check if the service provider is available when you need them. A quick response time is crucial, especially in emergencies.
- Insurance and certifications: Ensure that the service provider has proper insurance coverage and relevant certifications. This ensures their legitimacy and guarantees protection in case of any issues.
- Pricing: Get quotes from different service providers and compare their prices. However, keep in mind that the cheapest option may not always be the best. Consider the overall value and reputation of the service provider.
By considering these factors and following these guidelines, you can choose the right professional service provider to help you with your stubborn frozen gas cap. Remember, seeking professional assistance not only saves you time and frustration, but it also ensures that the job is done safely and effectively, without causing any further damage.
Frequently Asked Questions Of How To Get A Frozen Gas Cap Off
Why Won T My Gas Cap Open?
The gas cap may not open due to a faulty latch or a jammed mechanism. Check for any debris or ice blocking the cap. If the problem persists, consult a professional to inspect and repair the gas cap.
Should There Be Pressure When Removing Gas Cap?
There should not be pressure when removing the gas cap. Gently twist counterclockwise to release the cap without force. Applying pressure may cause damage or result in fuel leakage. Be cautious and avoid excessive force while removing the gas cap.
How Do You Lock And Unlock A Gas Cap?
To lock or unlock a gas cap, locate the cap on your vehicle. Turn it clockwise to lock and counterclockwise to unlock. Make sure it is securely locked to prevent fuel theft or leakage.
What Happens If You Accidentally Leave Your Gas Cap Off?
Accidentally leaving your gas cap off can lead to fuel evaporation, decreased fuel efficiency, and potential vehicle damage. It is important to replace the gas cap promptly to maintain proper fuel system function and prevent any issues.
How Do You Unlock A Frozen Gas Cap?
To unlock a frozen gas cap, try using a hairdryer to warm the area around the cap. Then, apply a lubricant like WD-40 and gently twist it open.
What Causes A Gas Cap To Freeze?
A gas cap can freeze due to moisture and condensation, especially in colder temperatures. This can cause the cap to become stuck and difficult to open.
Can You Pour Hot Water On A Frozen Gas Cap?
Pouring hot water on a frozen gas cap is not recommended as it can cause the cap to crack, leading to further issues. It’s best to use a hairdryer or lubricant to thaw it instead.
Conclusion
Getting a frozen gas cap off can be a frustrating experience. However, by following the tips mentioned in this blog post, such as using warm water, lubricants, and patience, you can easily overcome this issue. Remember to take precautions to prevent future freezing, like keeping your car in a garage or using a gas cap cover.
Stay prepared and keep your vehicle running smoothly all year round.
- How to Test Ac Compressor Clutch: Mastering the Ultimate AC Diagnosis - May 17, 2024
- How Does Water Infiltrate a Jet Ski Engine? - May 17, 2024
- How to Master Code Reading with Autozone’s Reader: Unlock Your Car’s Secrets - May 17, 2024