To replace the positive battery terminal, first, disconnect the negative terminal, then the positive terminal. Once the positive terminal is disconnected, remove the old terminal and attach the new one, finally, reconnect the negative terminal.
When it comes to maintaining your vehicle, replacing the positive battery terminal is an essential task that you may need to do at some point. Whether it’s due to corrosion, aging, or damage, a faulty positive terminal can cause electrical issues and prevent your car from starting.
In this guide, we will walk you through the process of replacing the positive battery terminal to ensure that your vehicle stays powered and functional.
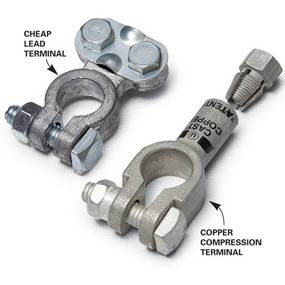
Credit: www.familyhandyman.com
Step 1: Gather Necessary Materials
Safety Precautions
Before starting, ensure safety by wearing protective gloves and eye gear.
Required Tools
Here are the tools you need:
- Wrench or pliers
- Wire brush
- New positive battery terminal
- Baking soda and water solution
Step 2: Disconnect The Negative Terminal
Before replacing the positive battery terminal, it’s critical to disconnect the negative terminal to avoid any accidental electrical surges.
Locate The Negative Battery Terminal

First, locate the negative battery terminal. It’s usually marked with a minus (-) sign and is generally black in color, unlike the positive terminal.
Use Proper Tools To Disconnect
Use the appropriate tools (usually a wrench or pliers) to loosen the clamp on the negative terminal. Ensure the tool is the correct size to avoid damaging the terminal.
Safety Precautions
- Wear insulated gloves or use a cloth to avoid direct contact with metal parts.
- Make sure the car is turned off to prevent any electrical shock.
- Double-check the terminal is loose before carefully lifting it away from the battery.
Step 3: Disconnect The Positive Terminal
To replace the positive battery terminal, the third step is to disconnect the positive terminal. This can be done by using the appropriate wrench to loosen the nut and carefully removing the terminal from the battery post. Be sure to handle the terminal with care to avoid any accidents.
Locate The Positive Battery Terminal
First, identify the positive battery terminal. It is typically red and marked with a plus sign. The positive terminal is usually attached to the larger cable and is situated on the top of the battery.
Use Proper Tools To Disconnect
Ensure that you have the appropriate tools for the job, such as a wrench or socket set. Using the wrong tools can damage the terminal or cause injury. Place the wrench or socket on the nut of the positive terminal, making sure it fits securely.
Safety Precautions
- Always wear protective gloves and safety glasses to shield yourself from sparks and battery acid.
- Before disconnecting the terminal, take note of any electrical devices and settings in the vehicle, as removing the positive terminal may reset these.
- Avoid touching any metal surfaces with the wrench while loosening the positive terminal nut, as this can create a short circuit.
Step 4: Remove The Old Terminal
To replace the positive battery terminal, start by removing the old terminal carefully. This step is crucial in ensuring a smooth transition to the new terminal without any issues. Disconnecting the old terminal is necessary to complete the replacement process successfully.
Step 5: Install The New Terminal
To replace the positive battery terminal, the fifth step is to install the new terminal. This crucial step ensures a secure and efficient connection for optimal battery performance.
Select The Correct Replacement Terminal
Before installing the new positive battery terminal, it’s important to choose the correct replacement terminal. Make sure the new terminal matches the specifications of your battery and vehicle make and model. Refer to the owner’s manual or consult a professional if you’re unsure about which terminal to purchase. Selecting the right replacement terminal will ensure compatibility and help prevent any potential damage to your vehicle’s electrical system.
Attach The New Terminal Securely
Now that you have the correct replacement terminal, it’s time to attach it securely to the positive battery post. Follow these steps to ensure a secure installation:
- Step 1: Begin by cleaning the positive battery post using a battery cleaner or a mixture of baking soda and water. This will remove any corrosion or dirt that may hinder proper contact.
- Step 2: Apply a thin layer of dielectric grease to the positive battery post. This will prevent future corrosion and improve electrical conductivity.
- Step 3: Carefully position the new terminal over the positive battery post. Ensure that the terminal is aligned properly and sits snugly.
- Step 4: Tighten the terminal bolt securely using a wrench or socket. Avoid over-tightening, as this can damage the terminal or strip the threads.
- Step 5: Once tightened, give the terminal a gentle tug to ensure it is securely attached to the battery post. Any movement or looseness indicates the need for further tightening.
Safety Precautions
While installing the new positive battery terminal, it’s crucial to follow these safety precautions:
- Precaution 1: Always wear protective gloves and eye goggles to prevent any acid or corrosive material from coming into contact with your skin or eyes.
- Precaution 2: Disconnect the negative battery terminal first to avoid any electrical shock or damage during the installation process.
- Precaution 3: Double-check that all electrical components in your vehicle are turned off to minimize the risk of accidental short-circuits.
- Precaution 4: Be mindful of any sparks or open flames around the battery, as it contains flammable gases.
- Precaution 5: If you encounter any difficulties during the installation process, it is recommended to consult a professional or contact the vehicle manufacturer for assistance.
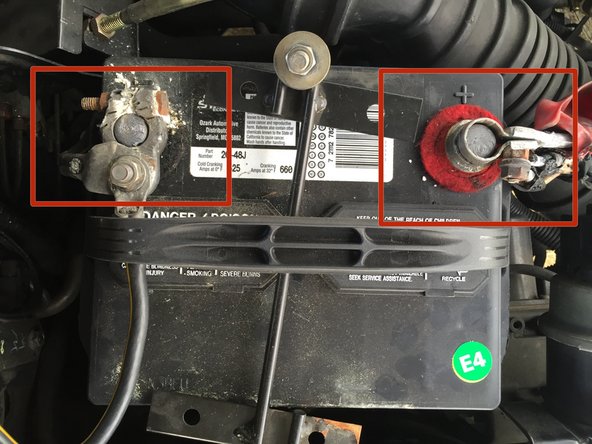
Credit: www.ifixit.com
Step 6: Reconnect The Positive Terminal
To successfully replace the positive battery terminal, the sixth step involves reconnecting it to the battery. Make sure to securely fasten the positive terminal to ensure proper functioning of your vehicle’s electrical system.
Now that you have successfully replaced the positive battery terminal, it’s time to complete the process by reconnecting it securely. Follow these steps to ensure a proper reconnection:Align The New Terminal With The Positive Post
Carefully align the new positive battery terminal with the positive post of the battery. Make sure the terminal fits snugly onto the post, ensuring a secure and stable connection. This alignment step is crucial to ensure the battery functions optimally and efficiently.Use Proper Tools To Reconnect
To reconnect the positive terminal effectively, it is important to use the right tools. Use a wrench or a socket wrench to tighten the battery clamps securely around the positive terminal. Ensure that the connection is tight, but be cautious not to overtighten, as it can damage the terminal or the post.Safety Precautions
When working with batteries, it is essential to prioritize safety. Ensure that you are wearing protective gloves and eyewear throughout the process. This helps to safeguard yourself from any accidental contact with corrosive substances or electrical sparks. Additionally, make sure that the battery is securely held in place and does not move while reconnecting the positive terminal. This minimizes the risk of damage or short-circuits that could occur during the reconnection process. Remember, by adhering to these safety precautions, you can ensure a smooth and secure reconnection of the positive battery terminal. Following these steps is crucial when replacing the positive battery terminal of your vehicle. It guarantees an efficient and long-lasting battery life, allowing your car to perform optimally. Take your time during the reconnection process, ensuring proper alignment and utilizing the correct tools. By prioritizing your safety and following these instructions, you will successfully complete the replacement task and have your vehicle up and running in no time.Step 7: Reconnect The Negative Terminal
To replace the positive battery terminal, reconnecting the negative terminal is crucial. This step completes the process and ensures proper connection for the battery replacement. Following these instructions ensures a successful replacement of the positive terminal.
< h2 >Step 7: Reconnect the Negative Terminal< /h2 > After replacing the positive battery terminal, it’s time to reconnect the negative terminal to complete the process successfully. < h3 > Align the negative terminal with the negative post< /h3 > Align the negative terminal ensuring that it is properly positioned over the negative post on the battery. < h3 > Use proper tools to reconnect< /h3 > Use the appropriate tools, such as a wrench or socket set, to securely attach the negative terminal to the battery post. < h3 > Safety precautions< /h3 > – Wear safety gloves to protect your hands from any potential hazards. – Ensure the terminal connections are tight and secure to prevent any electrical issues. – Avoid touching metal objects with the wrench to prevent short circuits. – Double-check the connection to ensure everything is correctly attached.
Credit: www.terminalmart.com
Step 8: Test The Battery
Use A Multimeter To Check Voltage
With the positive terminal securely connected, use a multimeter to check the voltage of the battery. Set the multimeter to DC voltage and connect the positive probe to the positive terminal and the negative probe to the negative terminal. Check the reading, which should be around 12.6 volts for a fully charged battery.
Ensure Proper Connection
Inspect the positive terminal connection to ensure that it is secure and free from any corrosion. A proper connection is crucial for the efficient operation of the battery. If there is any sign of corrosion, clean the terminal before proceeding further.
Confirm Functionality

After securing the positive terminal and ensuring proper connection, confirm the functionality of the battery. Turn on the ignition and check that all electrical systems are functioning as expected. If there are any issues, revisit the positive terminal and connections to rectify the problem.
Frequently Asked Questions On How To Replace Positive Battery Terminal
Can You Replace Battery Terminals Yourself?
Yes, you can replace battery terminals yourself by following proper safety measures and using the right tools. It’s a simple DIY task, but if you’re unsure, it’s best to consult a professional for assistance.
How Do You Remove A Positive Battery Terminal?
To remove a positive battery terminal, first, ensure the engine is off. Then, use a wrench to loosen the nut on the terminal. Carefully lift the terminal off the battery and secure it away from contact.
Can You Fix A Broken Battery Terminal?
Yes, a broken battery terminal can be fixed by replacing it with a new terminal. It’s important for proper functioning.
How Much Does It Cost To Replace A Positive Battery Cable?
The cost of replacing a positive battery cable can range from $50 to $200, depending on the type of vehicle and the quality of the cable used. It is important to consult a professional mechanic to get an accurate estimate for your specific vehicle.
How Do You Know If Your Positive Battery Terminal Needs Replacement?
If you experience difficulty starting your car or notice corrosion around the terminal, it’s time for a replacement.
What Causes The Positive Battery Terminal To Corrode?
Corrosion occurs due to a chemical reaction between battery acid and metal, often aggravated by moisture and heat.
What Tools Do You Need To Replace The Positive Battery Terminal?
You’ll need a wrench, pliers, anti-corrosion spray, wire brush, safety goggles, and gloves to safely replace the terminal.
Conclusion
To sum up, replacing a positive battery terminal is a simple yet crucial task. By following the steps outlined in this guide, you can ensure the safety and longevity of your vehicle. Remember to always prioritize safety and refer to professional help when needed.
Stay empowered and informed about your vehicle maintenance!